 Ujaval Gandhi
在 QGIS 中使用 Google Maps Engine Connector
警告
在 2015 年 1 月 29 日,Google Maps Engine 已停止新帳戶的申請,而舊帳戶至多也只能使用此服務至 2016 年 1 月 29 日。
Google Maps Engine is a cloud based mapping platform for creating and sharing custom maps. Google Maps Engine Connector is a plugin that allows you to view and upload Google Maps Engine data from within QGIS. 本教學會帶領你建立 Google Maps Engine 的帳戶,然後取得使用 Connector 的登入資訊,並使用 Google Maps Engine 建立地圖,最後在 QGIS 中存取與修改。
內容說明
使用附加元件把 San Francisco 的 bike routes 圖層上傳到 Google Maps Engine 中,當圖層建立並設定好樣式後,再把它以 WMS 圖層格式載到 QGIS 之中。
你還會學到這些
使用 Google Developer Console 建立要在 Google APIs 下使用的新專案
取得資料
San Francisco Data 是舊金山市不錯的開放資料來源。
使用在網站上的 Export 選項下載 SFMTA Bikeway Network shapefile。
資料來源 [SFMTA]
建立 Google Maps Engine 的帳號
You can sign up for a free Google Maps Engine trial account. The trial account is a full featured Maps Engine instance with limited storage quota. Visit Google Maps Engine homepage and click the Get started with a free account link.
You will need to sign-in to your Google account. If you wish to use your work email, you can create a new Google account with your work email address as well. Once signed in, you will see the Create a Maps Engine Project screen. Enter a Project Name which will identify your account when using Google Maps Engine. Accept the terms and click Accept and create button.
建立 Google Developer Console 專案
The Google Maps Engine Connector uses the
Google Maps Engine
API
to access the data stored in your account. You will need to obtain special credentials which the plugin will use to programatically access your data. Visit Google Developer Console and click Create Project. EnterGME Connector for QGIS APIas the PROJECT NAME andgme-qgis-apias the PROJECT ID. These names are just a suggestion - you may use any name and id you like.
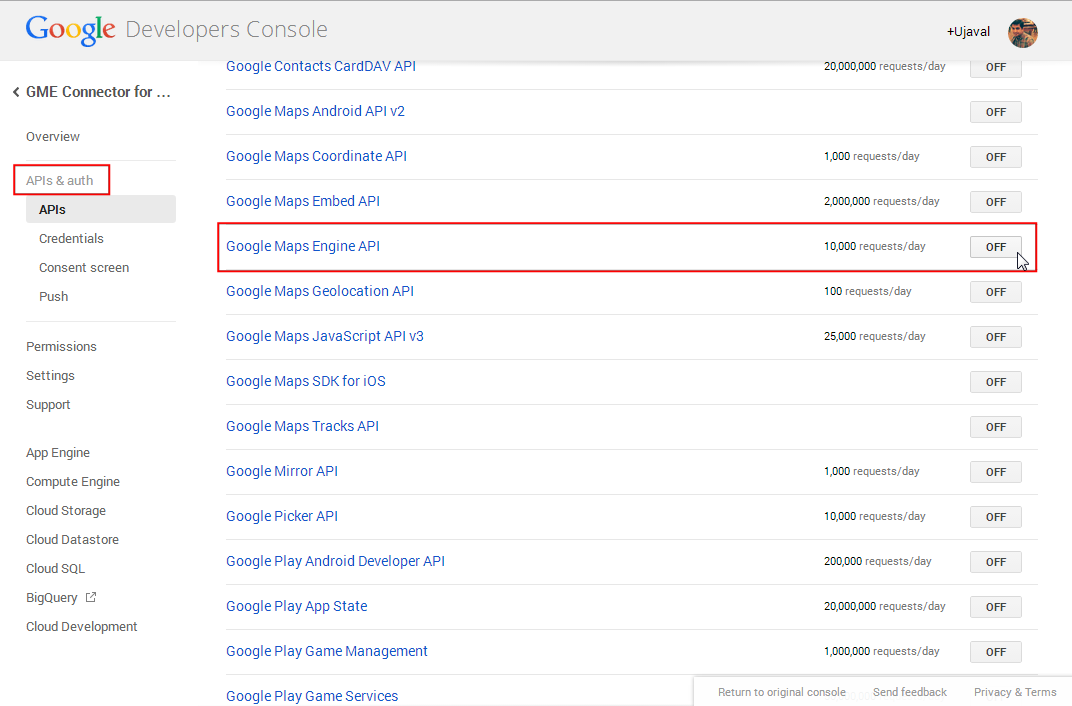
Once the project is created, click the APIs & auth link. Scroll down and find the Google Maps Engine API. Click the OFF button to toggle it to ON.
Next, click on the Credentials link. Click CREATE NEW CLIEND ID under the OAuth section.

In the Create Client ID dialog, select Installed Application as the APPLICATION TYPE and Other as the INSTALLED APPLICATION TYPE. Click Create Client ID.
Once the client id is created, you will see a new section called Client ID for native application. Note the Client ID and Client secret. These are the credentials you will need to use in QGIS.
開啟 QGIS,選擇 ,安裝
Google Maps Engine Connector附加元件。

Once the plugin is installed, you will see a new toolbar in QGIS. This toolbar contains various tools to work with Google Maps Engine. Click the More button.
In the Advanced Settings dialog, enter the Client ID and Client Secret you obtained from Google Developer Console. Click OK.
As you entered new API credentials, you will be prompted to log-in and authorize the plugin to use these. Sign-in to your Google account.
在下個視窗選 接受。
If all went well, you will see a message indicating you have successfully logged in.
現在來加入剛才下載的 SFMTA Bikeway Network 圖層吧。選擇 ,找到剛下載的
SFMTA_Bikeway_Network.zip檔案,按下 開啟,選擇SFMTA_Bikeway_Network.shp,最後按 確定。
One of the features of the
Google Maps Engine Connectorplugin is the ability to upload datasets directly from QGIS. Select theSFMTA_Bikeway_Networklayer and click Upload icon in the toolbar.
In the Upload a dataset to Google Maps Engine dialog, enter a Description of the dataset. You may leave all other settings to default values. Click OK.
The plugin will use the Google Maps Engine API to upload the layer and create a Google Maps Engine Data Source. Once the upload is finished, a new browser tab will open and take you to the newly created data source.
The next few steps will demonstrate the process of creating a map using Google Maps Engine. Once the map is created, we will access that map using the plugin in QGIS. Once your vector table has finished processing, click Create styled layer.
圖層命名為
SFMTA_Bikeway_Network然後按下 Create。
Click Add rule to add a custom style for the layer.
Choose the color and label options under the Line style section. Click Apply to view the style settings applied to your layer. You may also select No Basemap option from top-right corner to allow you to see your layer without the underlying basemap. Once you are satisfied with the styling, switch to the Info windows tab.
Here you can specify what content is shown when a feature is clicked on the map. You can access the feature attributes using the markup
{attribute_name}. In this case, we just want to display the street name for the line feature. Enter the following in the text area. Click Apply and click on any line feature on the map to test the info window code. When done, check the Publish on exit button and click Exit.
<div class='googeb-info-window' style='font-family: sans-serif'>
 {STREETNAME}  {TYPE}
</div>
Click Add to map to create a map with this layer.
Select Create new and enter
SFMTA Bikeway Networkas the Map title.
You will see a new map containing the styled layer. You have an option of choosing different basemaps for the map. Since this is a bike path map, you can select the Terrain style basemap.
點選 Publish map。
Once the map is published, click on the Access links icon.
You will see various options to view, embed and access the newly created map. Since we will be accessing the map using the QGIS plugin, you do not need any links from here.
回到 QGIS,點選在工具列上的 Search 鈕。
In the Maps Engine Maps dialog, you will see your map listed. Click on the row to select it. Click Add Selected to Map.
The plugin will query Google Maps Engine and load a vector layer containing the bounding box of the map. If you do not see any data on the canvas, right-click on the
SFMTA_Bikeway_Networklayer and select Zoom to Layer Extent.
Click on the bounding box layer to select it. You will notice that the View tools are now enabled. Click on the WMS Overlay icon in the toolbar.
在 Select A Layer to Add 視窗中,選擇
SFMTA_Bikeway_Network圖層然後按下 Add Selected to Map。
A new WMS layer will be added to QGIS and you will see your styled layer from Google Maps Engine displayed in QGIS.
Hope this tutorial gives an overview of the capabilities of the plugin. You can visit the plugin homepage to view the source code and learn more about the plugin.
Below is the Google Maps Engine map that was created for this tutorial.