 Ujaval Gandhi
Building a Python Plugin (QGIS3)
Plugins are a great way to extend the functionality of QGIS. You can write plugins using Python that can range from adding a simple button to sohpisticated toolkits. This tutorial will outline the process involved in setting up your development environment, designing the user interface for a plugin and writing code to interact with QGIS. Please review the Getting Started With Python Programming (QGIS3) tutorial to get familiar with the basics.
Note
If you are building a new plugin, I strongly recommend building a Processing Plugin instead of the GUI plugin described in this tutorial. See Building a Processing Plugin (QGIS3) for details.
Overview of the Task
We will develop a simple plugin called Save Attributes that will allow users to pick a vector layer and write its attributes to a CSV file.
Get the Tools
Qt Creator
Qt is a software development framework that is used to develop applications that run on Windows, Mac, Linux as well as various mobile operating systems. QGIS itself is written using the Qt framework. For plugin development, we will use an application called Qt Creator to design the interface for our plugin.
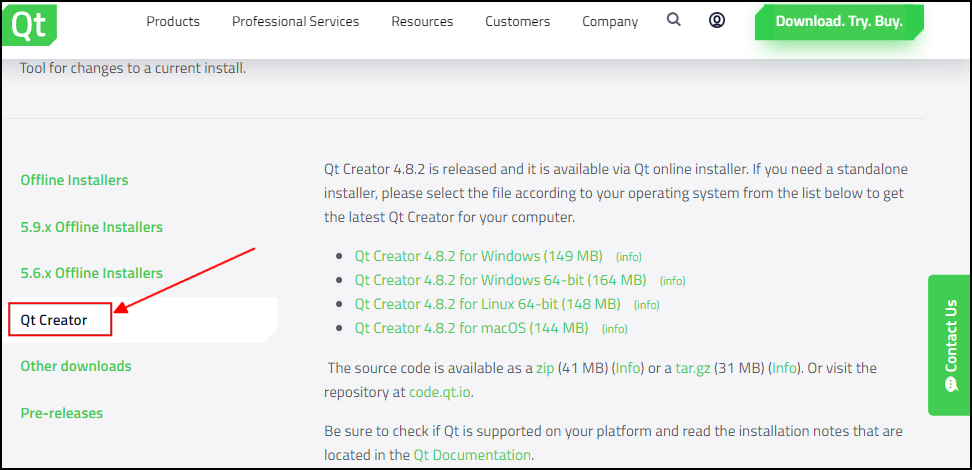
Download and install the Qt Creator installer from Qt Offline Installers. Make sure you select Qt Creator on the download page. Note that you will have to create a free Qt account to install the package.
Note
OSGeo4w installer for QGIS on Windows include a copy of Qt Designer program which is a lightweight version of Qt Creator and perfectly suitable for building plugins. You may skip downloading Qt Creator and use it instead from .
Python Bindings for Qt
Since we are developing the plugin in Python, we need to install the python
bindings for Qt. The method for installing these will depend on the platform
you are using. For building plugins we need the pyrcc5 command-line tool.
Windows
Relevant python bindings are included in the QGIS install on Windows. But to use them from the plugin folder, we need to indicate the path to the QGIS install.
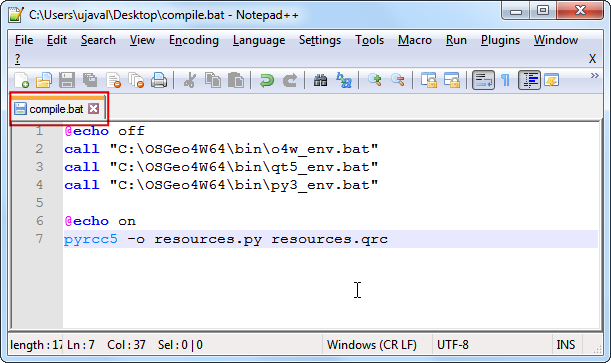
Create a Windows Batch file (.bat extension) with the following content and save it on your computer as compile.bat. We will later copy this file to the plugin folder. If you installed QGIS at a different path, replace the C:\OSGeo4W64\bin\ with your path.
@echo off
call "C:\OSGeo4W64\bin\o4w_env.bat"
call "C:\OSGeo4W64\bin\qt5_env.bat"
call "C:\OSGeo4W64\bin\py3_env.bat"

@echo on
pyrcc5 -o resources.py resources.qrc
Mac
Install the Homebrew package manager. Install PyQt package by running the following command:
brew install pyqt
- Linux
Depending on your distribution, find and install the
python-qt5package. On Ubuntu and Debian-based distributions, you can run the following command:
sudo apt-get install python-qt5
Note
You may find that QGIS has already installed this package.
A Text Editor or a Python IDE
Any kind of software development requires a good text editor. If you already have a favorite text editor or an IDE (Integrated Development Environment), you may use it for this tutorial. Otherwise, each platform offers a wide variety of free or paid options for text editors. Choose the one that fits your needs.
This tutorial uses Notepad++ editor on Windows.
Windows
Notepad++ is a good free editor for windows. Download and install the Notepad++ editor.
Note
If you are using Notepad++, makes sure to go to and enable Replace by space. Python is very sensitive about whitespace and this setting will ensure tabs and spaces are treated properly.
Plugin Builder plugin
There is a helpful QGIS plugin named Plugin Builder which creates all the necessary files and the boilerplate code for a plugin. Find and install the Plugin Builder plugin. See Using Plugins for more details on how to install plugins.
Plugins Reloader plugin
This is another helper plugin which allows iterative development of plugins. Using this plugin, you can change your plugin code and have it reflected in QGIS without having to restart QGIS every time. Find and install the Plugin Reloader plugin. See Using Plugins for more details on how to install plugins.
Note
Plugin Reloader is an experimental plugin. Make sure you have checked Show also experimental plugins in Plugin Manager settings if you cannot find it.
Procedure
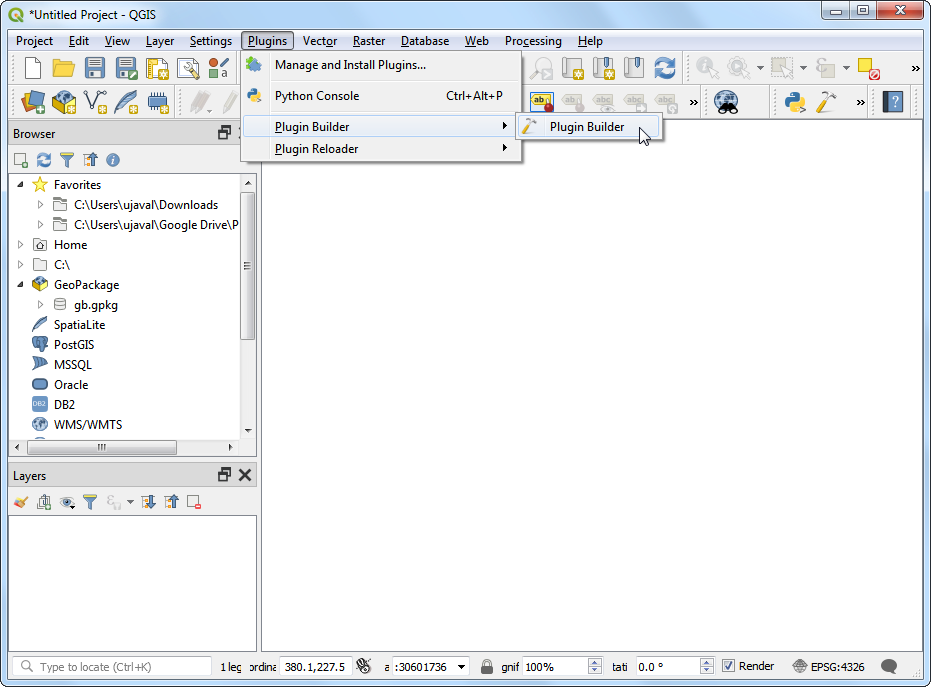
Open QGIS. Go to .
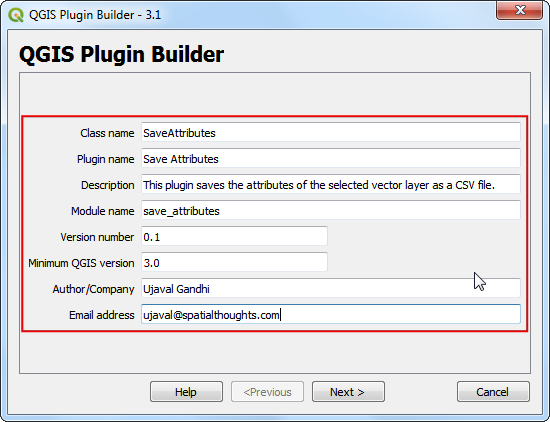
You will see the QGIS Plugin Builder dialog with a form. You can fill the form with details relating to our plugin. The Class name will be the name of the Python Class containing the logic of the plugin. This will also be the name of the folder containing all the plugin files. Enter
SaveAttributesas the class name. The Plugin name is the name under which your plugin will appear in the Plugin Manager. Enter the name asSave Attributes. Add a description in the Description field. The Module name will be the name of the main python file for the plugin. Enter it assave_attributes. Leave the version numbers as they are and enter your name and email address in the appropriate fields. Click Next.
Enter a brief description of the plugin for the About dialog and click Next.

Select the
Tool button with dialogfrom the Template selector`. The Text for menu item value will be how the users will find your plugin in QGIS menu. Enter it asSave Attributes as CSV. The Menu field will decide where your plugin item is added in QGIS. Since our plugin is for vector data, selectVector. Click Next.

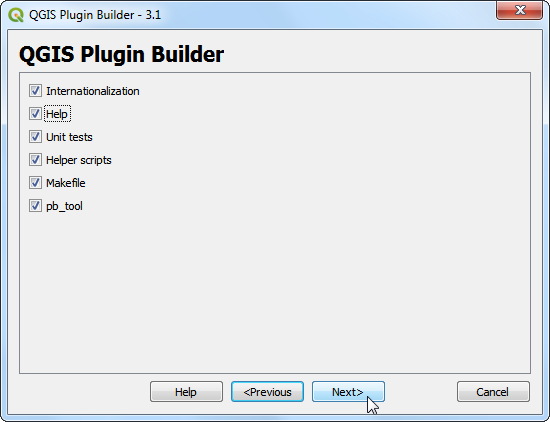
Plugin builder will prompt you for the type of files to generate. Keep the default selection and click Next.
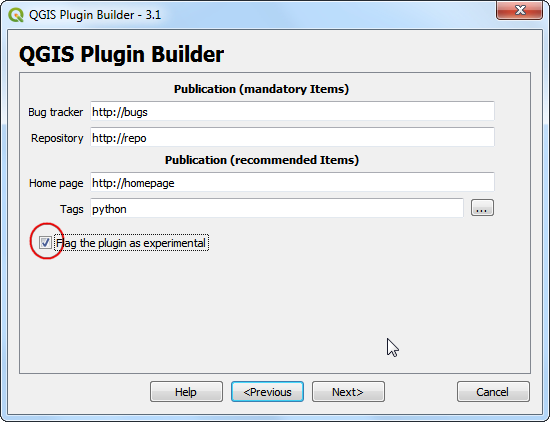
As we do not intend to publish the plugin, you may leave the Bug tracker, Repository and Home page values to default. Check the Flag the plugin as experimental box at the bottom and click Next.
You will be prompted to choose a directory for your plugin. For now, save it to a directory you can locate easily on your computer and click Generate.
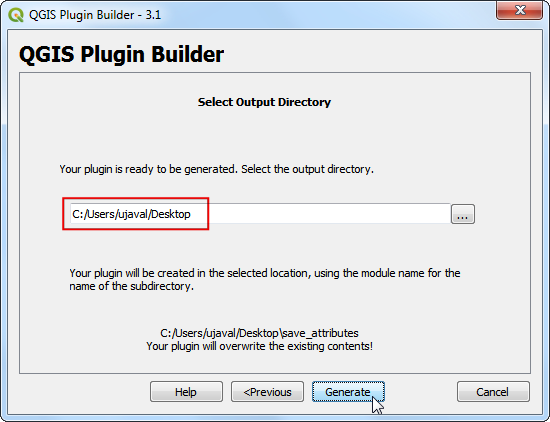
Next, press the generate button. You will see a confirmation dialog once your plugin template is created.
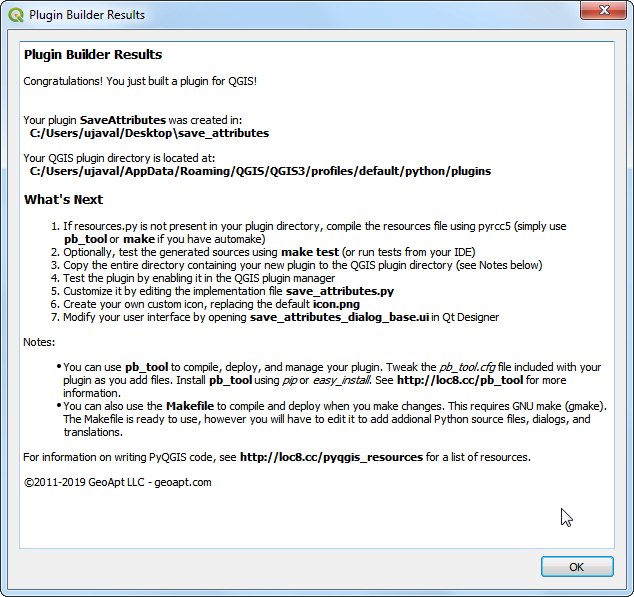
Note
You may get a prompt saying that pyrcc5 is not found in the path. You can ignore this message.
Before we can use the newly created plugin, we need to compile the
resources.qrcfile that was created by Plugin Builder. This file is part of the Qt Resource System which references all binary files used in the plugin. For this plugin, it will only have the plugin icon. Compiling this file generates application code that can be used in the plugin independent which platform the plugin is being run. Follow the platform specific instruction for this step.
Windows
You can now copy the compile.bat file (created during the Python Bindings for Qt section at the start) to the plugin folder. Once copied, double-click the file to run it. If the run was successful, you will see a new file called resources.py in the folder.

Note
If this step fails, you can launch cmd.exe and browse to the plugin folder using cd command. Run the Batch file by running compile.bat to see the error.
Mac and Linux
You will need to install pb_tool first. Open a Terminal and install it via pip.
sudo pip3 install pb_tool
Open a Terminal and go to the plugin directory and type pb_tool compile. This will run the pyrcc5 command that we had installed as part Python Bindings for Qt section.
pb_tool compile
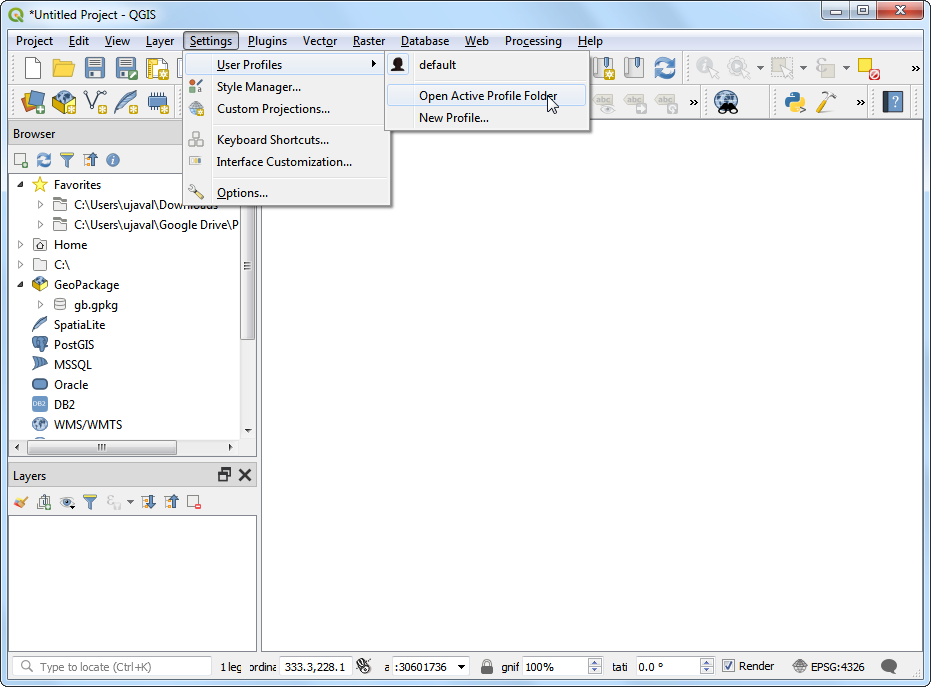
Plugins in QGIS are stored in a special folder. We must copy our plugin directory to that folder before it can be used. In QGIS, locate your current profile folder by going to .
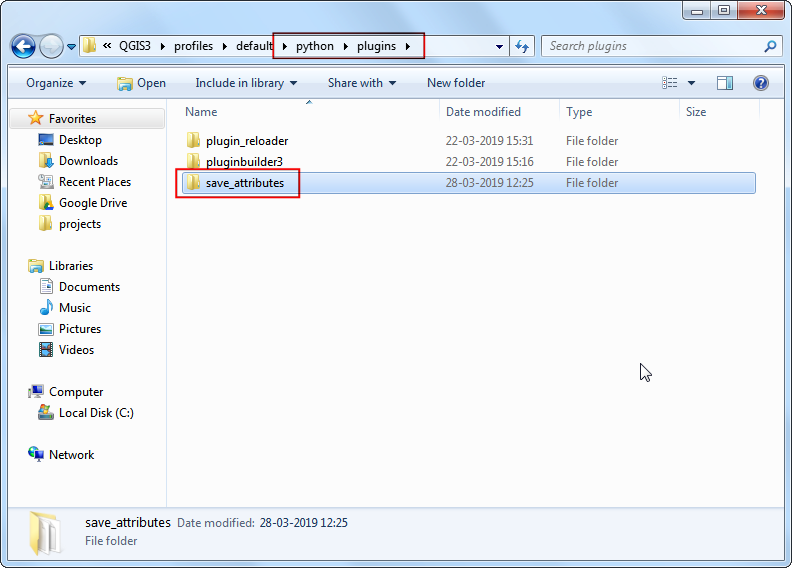
In the profile folder, copy the plugin folder to subfolder.
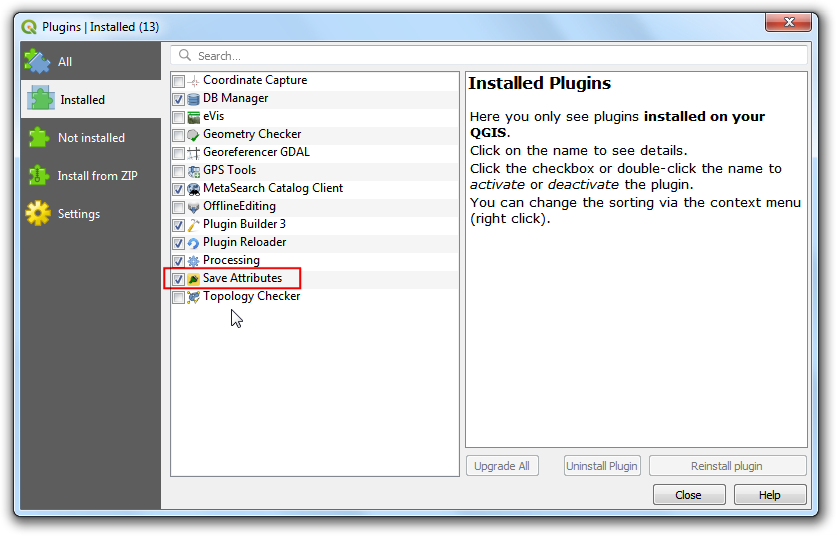
Now we are ready to have a first look at the brand new plugin we created. Close QGIS and launch it again. Go to and enable the
Save Attributesplugin in the Installed tab.
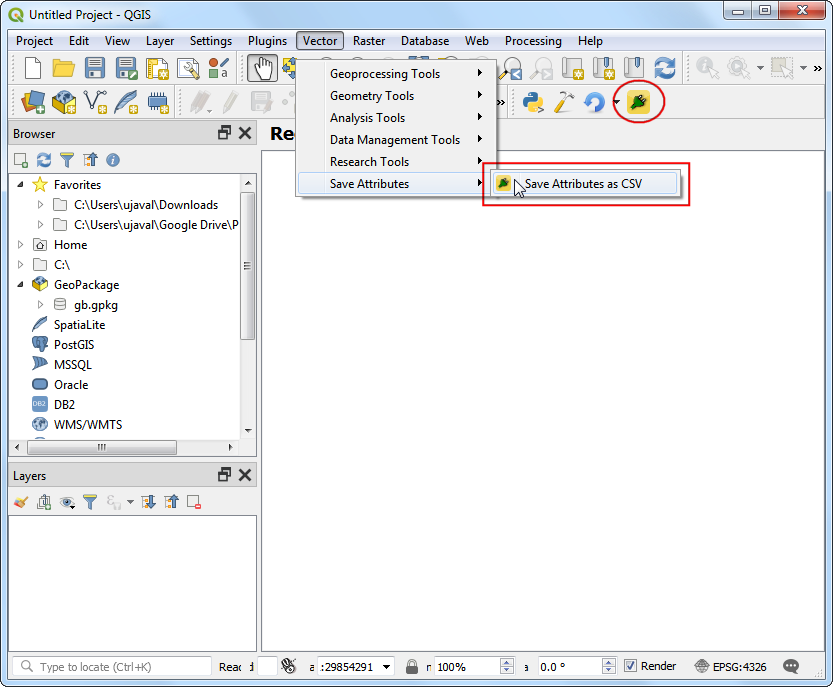
You will notice that there is a new icon in the plugin toolbar and a new menu entry under . Select it to launch the plugin dialog.
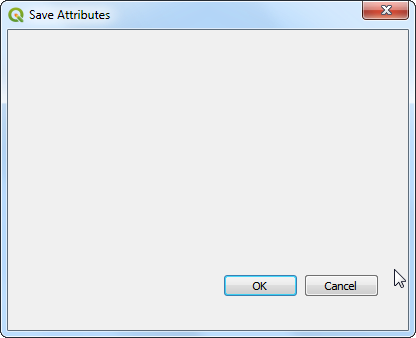
You will notice a new blank dialog named Save Attributes. Close this dialog.
We will now design our dialog box and add some user interface elements to it. Open the
Qt Creatorprogram and go to .
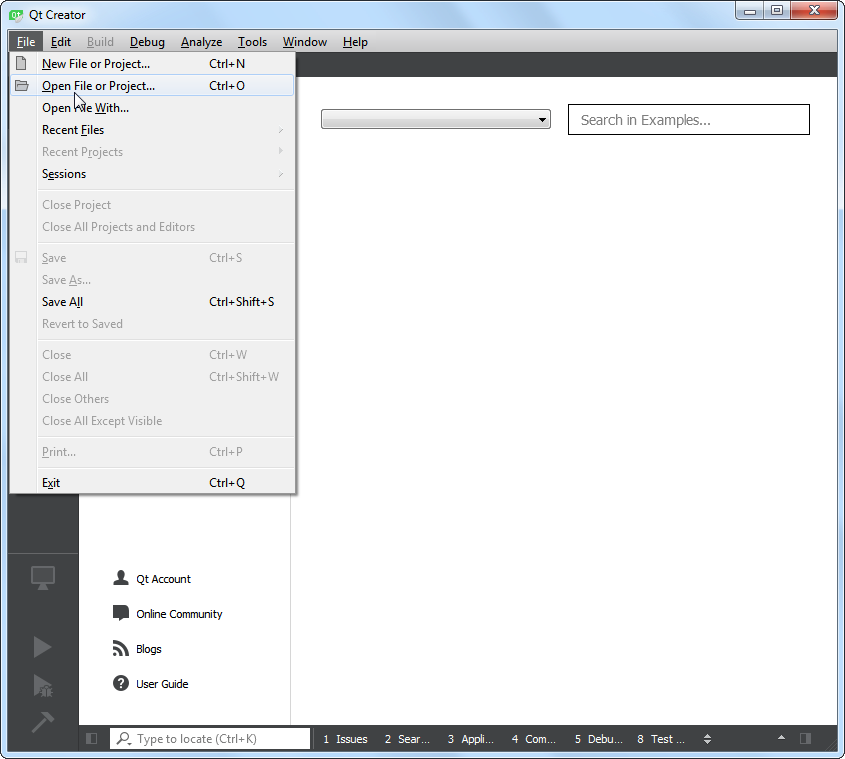
Browse to the plugin directory and select the
save_attributes_dialog_base.uifile. Click Open.
Note
Windows hides the AppData folder so you may not see it in the file selector dialog. You can enter AppData in the File name prompt from its parent directory to open it.
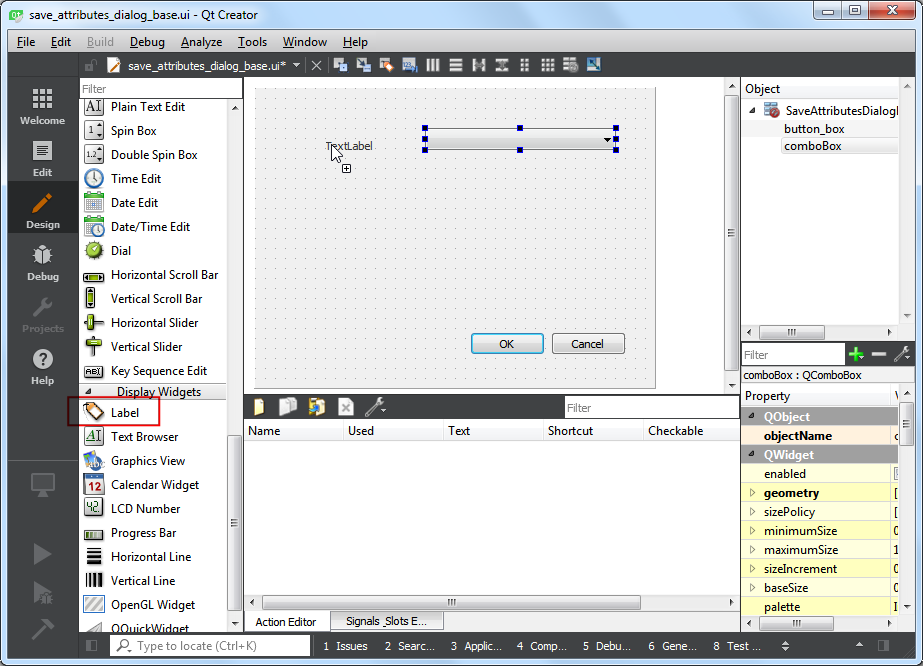
You will see the blank dialog from the plugin. You can drag-and-drop elements from the left-hand panel on the dialog. We will add a Combo Box type of Input Widgets. Drag it to the plugin dialog.
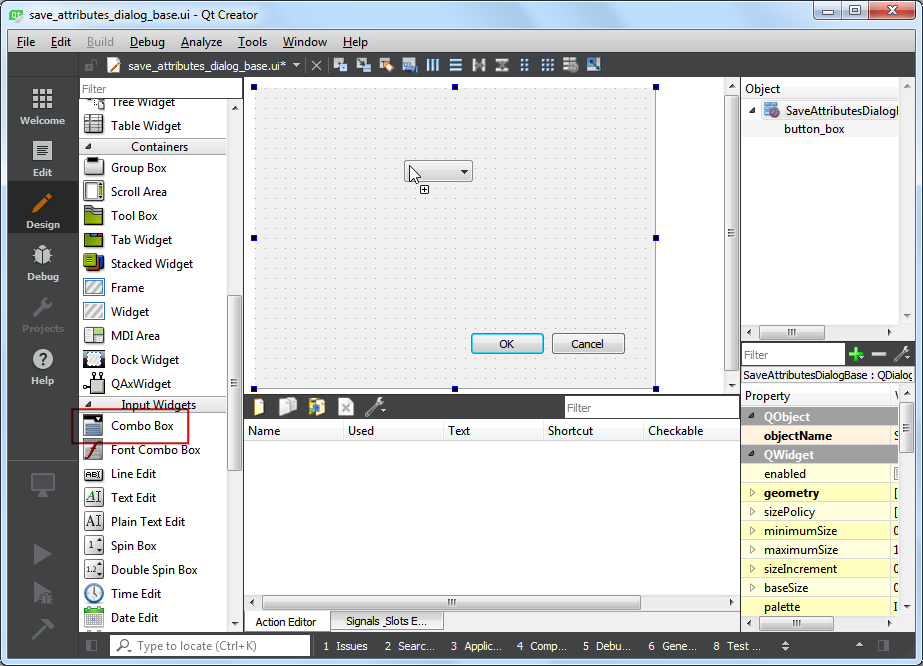
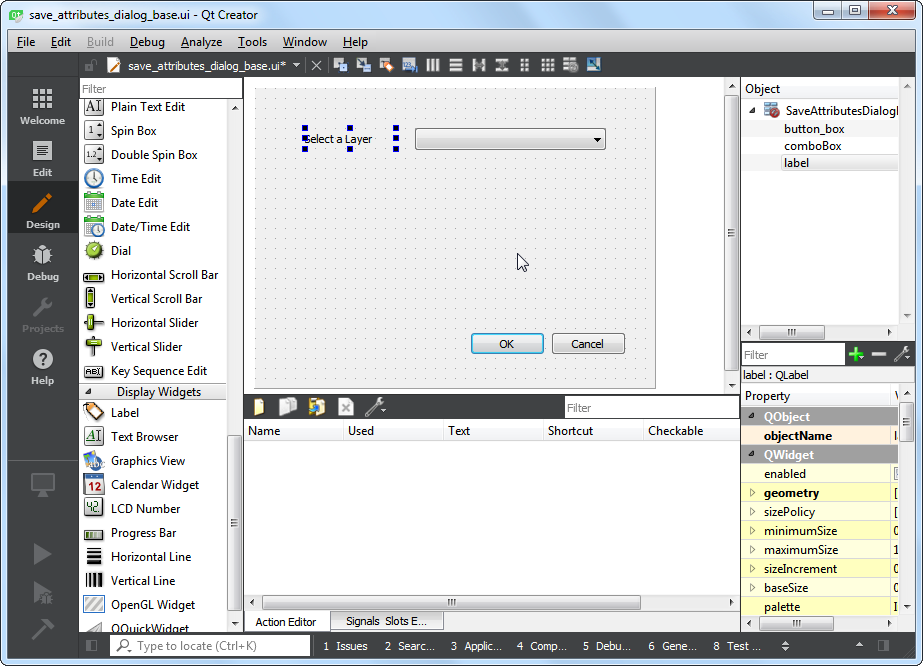
Resize the combo box and adjust its size. Now drag a Label type Display Widget on the dialog.
Click on the label text and enter
Select a layer.
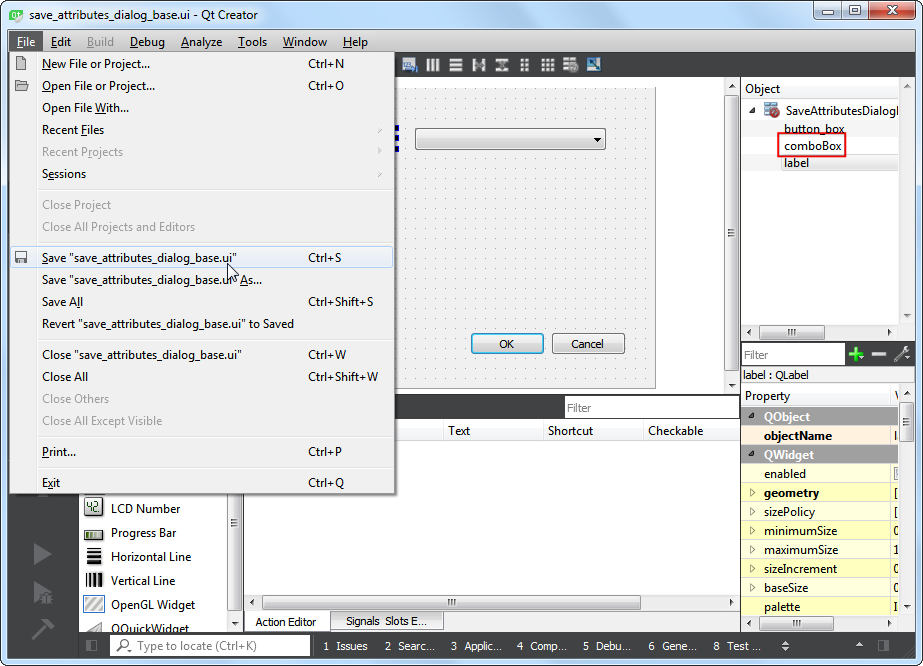
Save this file by going to . Note the name of the combo box object is
comboBox. To interact with this object using python code, we will have to refer to it by this name.
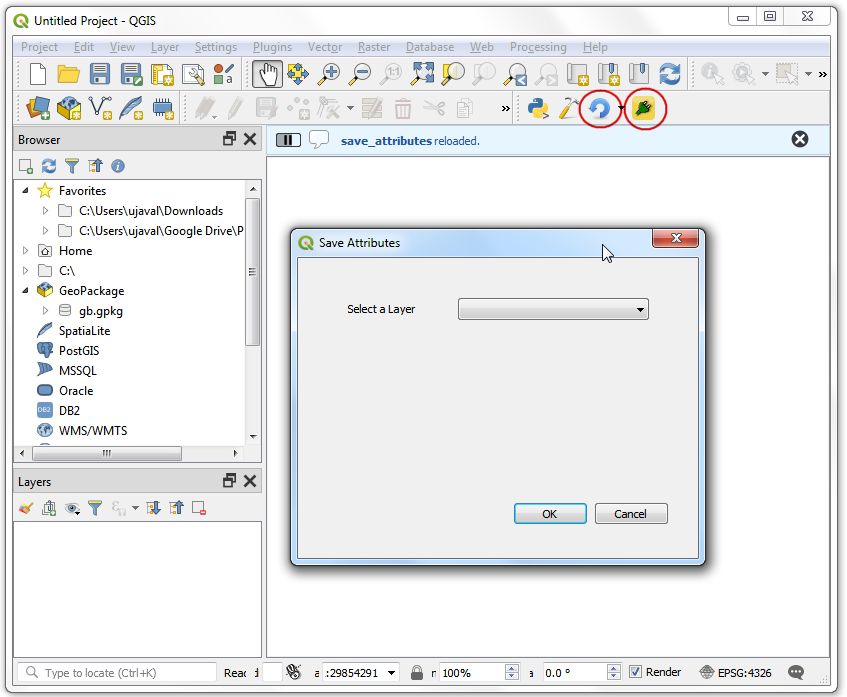
Let’s reload our plugin so we can see the changes in the dialog window. Go to . Select
SaveAttributesin the Configure Plugin reloader dialog.
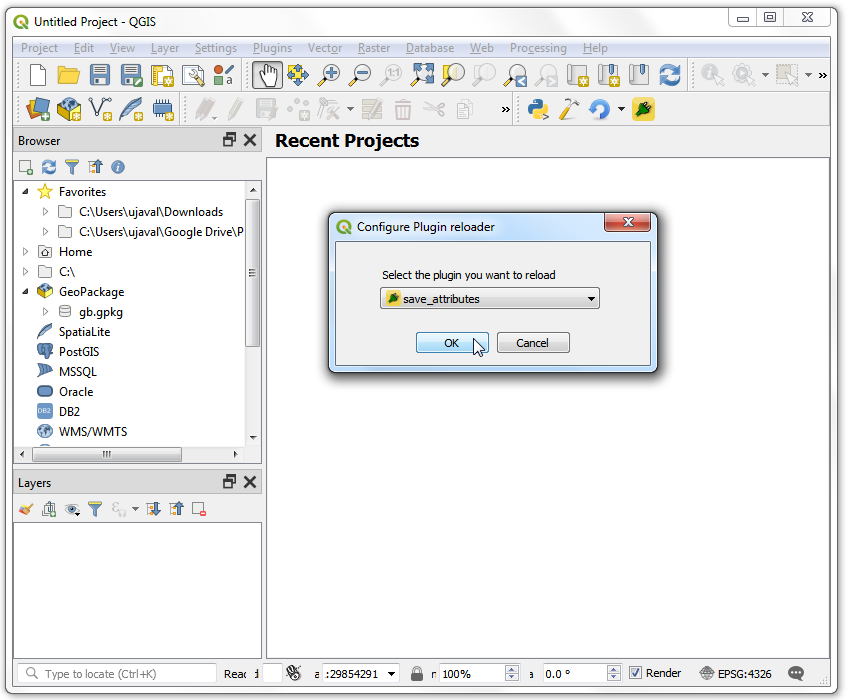
Click the Reload plugin button to load the latest version of the plugin. Click the Save Attributes as CSV button to open the newly designed dialog box.
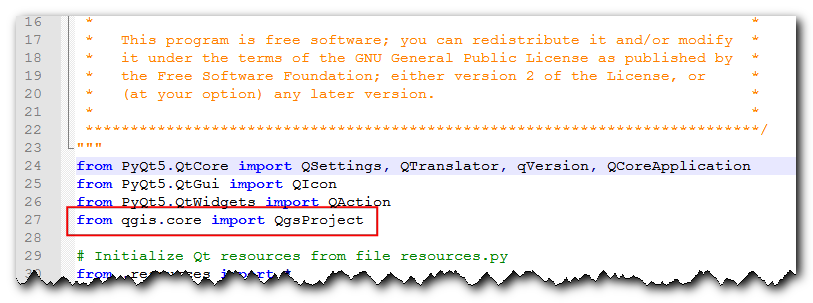
Let’s add some logic to the plugin that will populate the combo box with the layers loaded in QGIS. Go to the plugin directory and load the file
save_attributes.pyin a text editor. First, insert at the top of the file with the other imports:from qgis.core import QgsProject
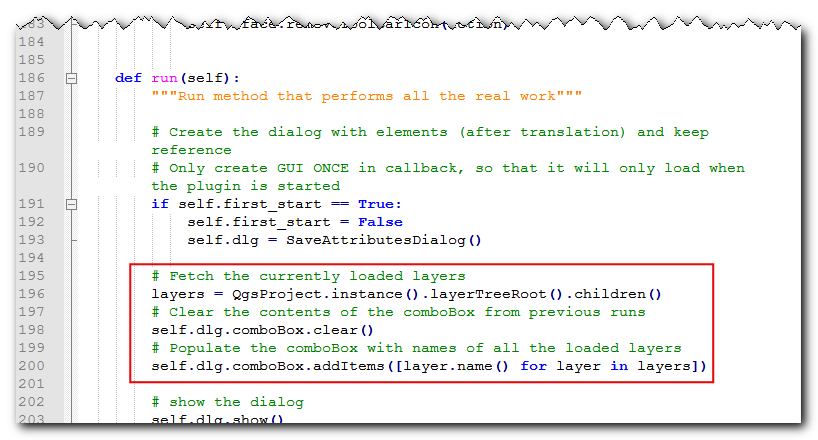
Then scroll down to the end and find the
run(self)method. This method will be called when you click the toolbar button or select the plugin menu item. Add the following code at the beginning of the method. This code gets the layers loaded in QGIS and adds it to thecomboBoxobject from the plugin dialog.# Fetch the currently loaded layers layers = QgsProject.instance().layerTreeRoot().children() # Clear the contents of the comboBox from previous runs self.dlg.comboBox.clear() # Populate the comboBox with names of all the loaded layers self.dlg.comboBox.addItems([layer.name() for layer in layers])
Back in the main QGIS window, reload the plugin by clicking on the Reload plugin button. To test this new functionality, we must load some layers in QGIS. After you have loaded some layers, launch the plugin by going to . You will see that our combo box is now populated with the layer names that are loaded in QGIS.

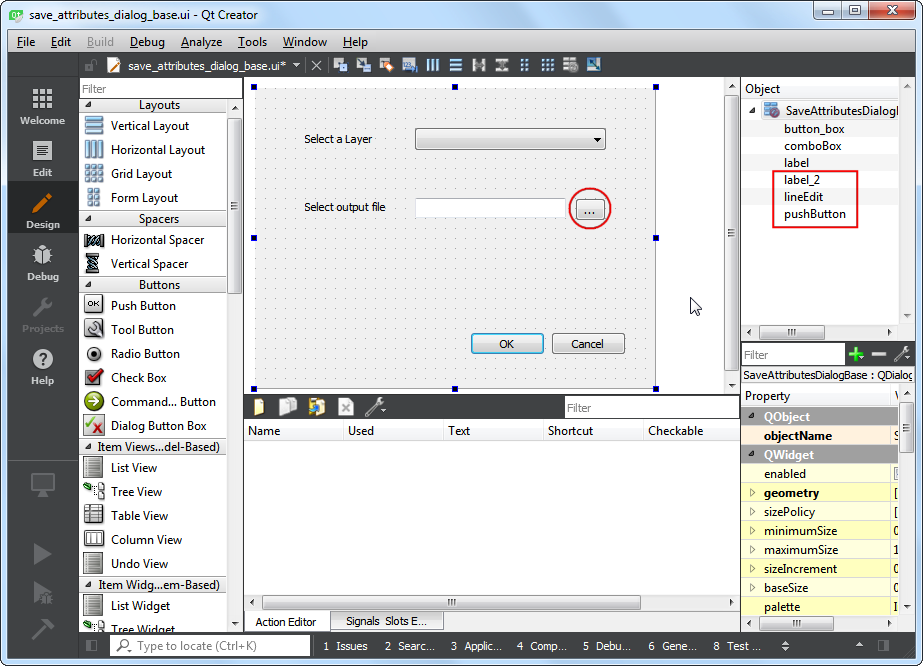
Let’s add the remaining user interface elements. Switch back to Qt Creator and load the
save_attributes_dialog_base.uifile. Add aLabelDisplay Widget and change the text toSelect output file. Add aLineEdittype Input Widget that will show the output file path that the user has chosen. Next, add aPush Buttontype Button and change the button label to.... Note the object names of the widgets that we will have to use to interact with them. Save the file.
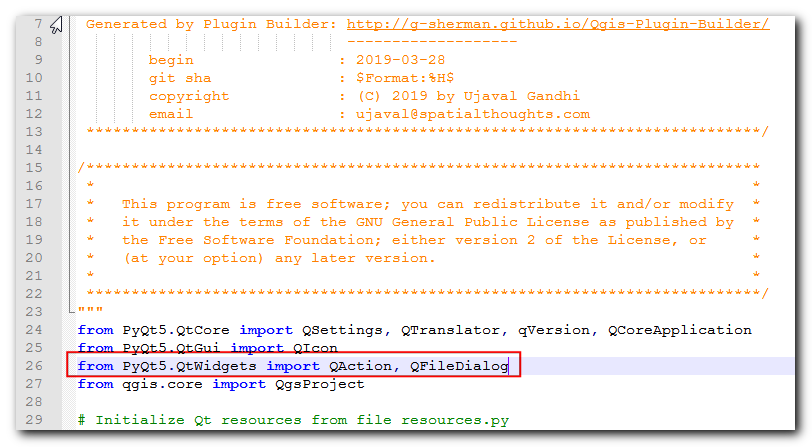
We will now add python code to open a file browser when the user clicks the
...push button and show the select path in the line edit widget. Open thesave_attributes.pyfile in a text editor. AddQFileDialogtoQtWidgetslist of imports at the top of the file.
Add a new method called
select_output_filewith the following code. This code will open a file browser and populate the line edit widget with the path of the file that the user chose. Note, howgetSaveFileNamereturns a tuple with the filename and the filter used.
def select_output_file(self):
  filename, _filter = QFileDialog.getSaveFileName(
    self.dlg, "Select   output file ","", '*.csv')
  self.dlg.lineEdit.setText(filename)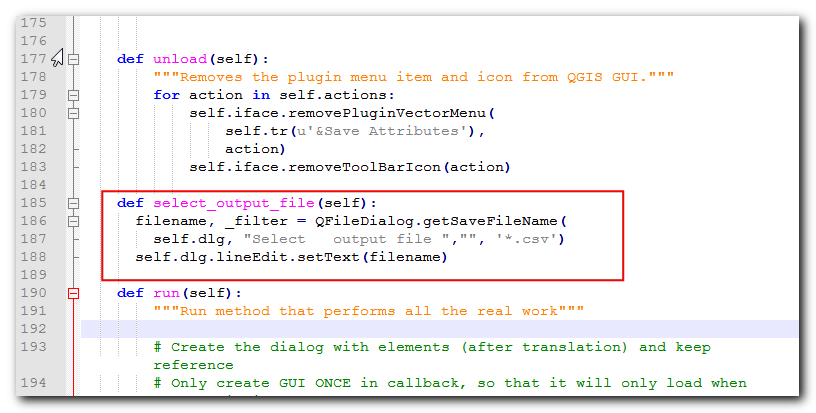
Now we need to add code so that when the … button is clicked,
select_output_filemethod is called. Scroll down to therunmethod and add the following line in the block where the dialog is initialized. This code will connect theselect_output_filemethod to theclickedsignal of the push button widget.
self.dlg.pushButton.clicked.connect(self.select_output_file)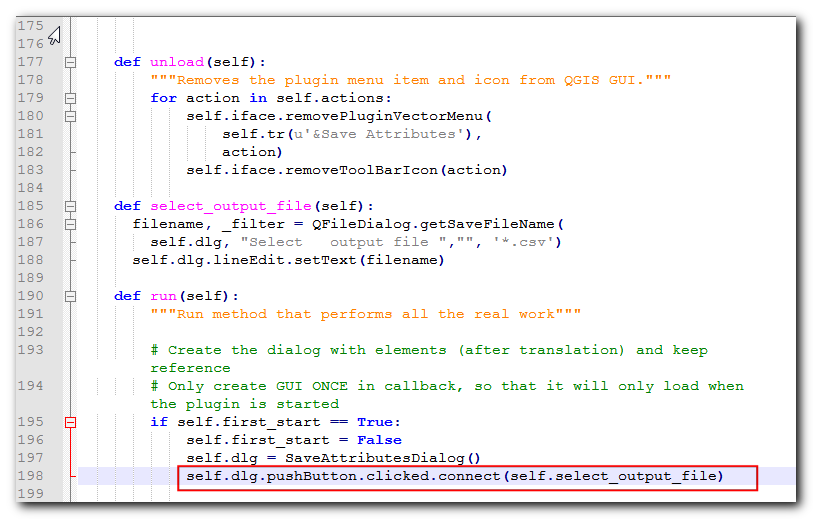
Back in QGIS, reload the plugin and run it. If all went fine, you will be able to click the
...button and select an output text file from your disk.
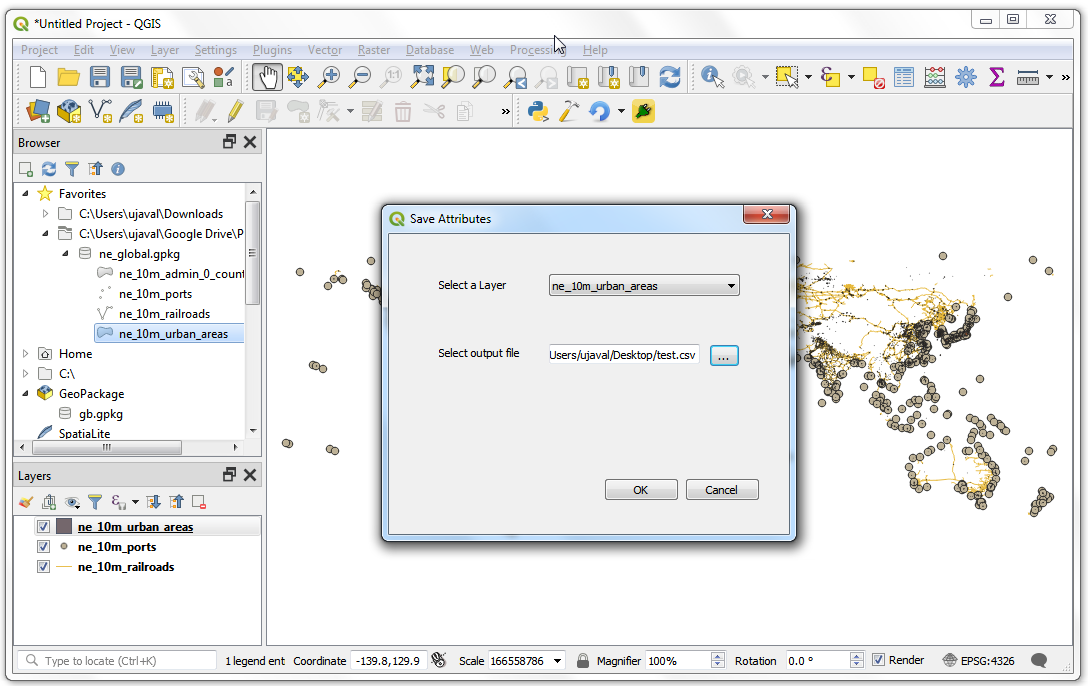
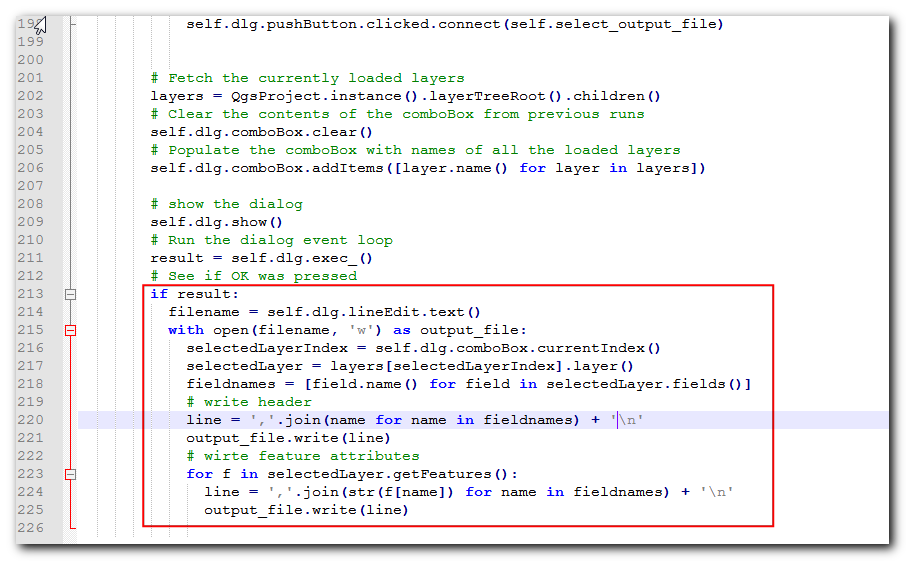
When you click OK on the plugin dialog, nothing happens. That is because we have not added the logic to pull attribute information from the layer and write it to the text file. We now have all the pieces in place to do just that. Find the place in the
runmethod where it sayspass. Replace it with the code below. The explanation for this code can be found in Getting Started With Python Programming (QGIS3).filename = self.dlg.lineEdit.text() with open(filename, 'w') as output_file: selectedLayerIndex = self.dlg.comboBox.currentIndex() selectedLayer = layers[selectedLayerIndex].layer() fieldnames = [field.name() for field in selectedLayer.fields()] # write header line = ','.join(name for name in fieldnames) + '\n' output_file.write(line) # write feature attributes for f in selectedLayer.getFeatures(): line = ','.join(str(f[name]) for name in fieldnames) + '\n' output_file.write(line)
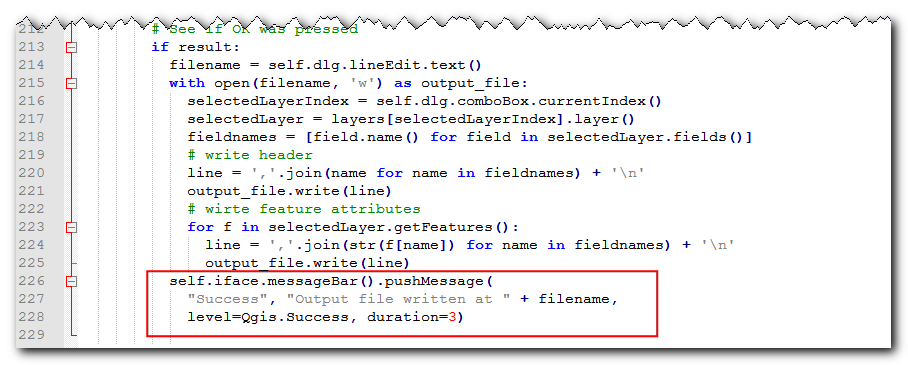
We have one last thing to add. When the operation finishes successfully, we should indicate the same to the user. The preferred way to give notifications to the user in QGIS is via the
self.iface.messageBar().pushMessage()method. AddQgistoqgis.corelist of imports at the top of the file and add the code below at the end of therunmethod.
self.iface.messageBar().pushMessage( "Success", "Output file written at " + filename, level=Qgis.Success, duration=3)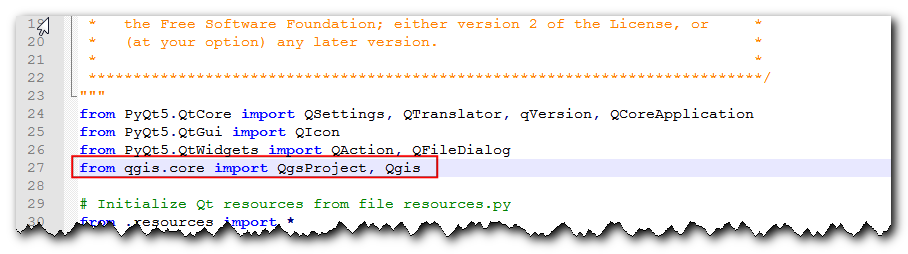
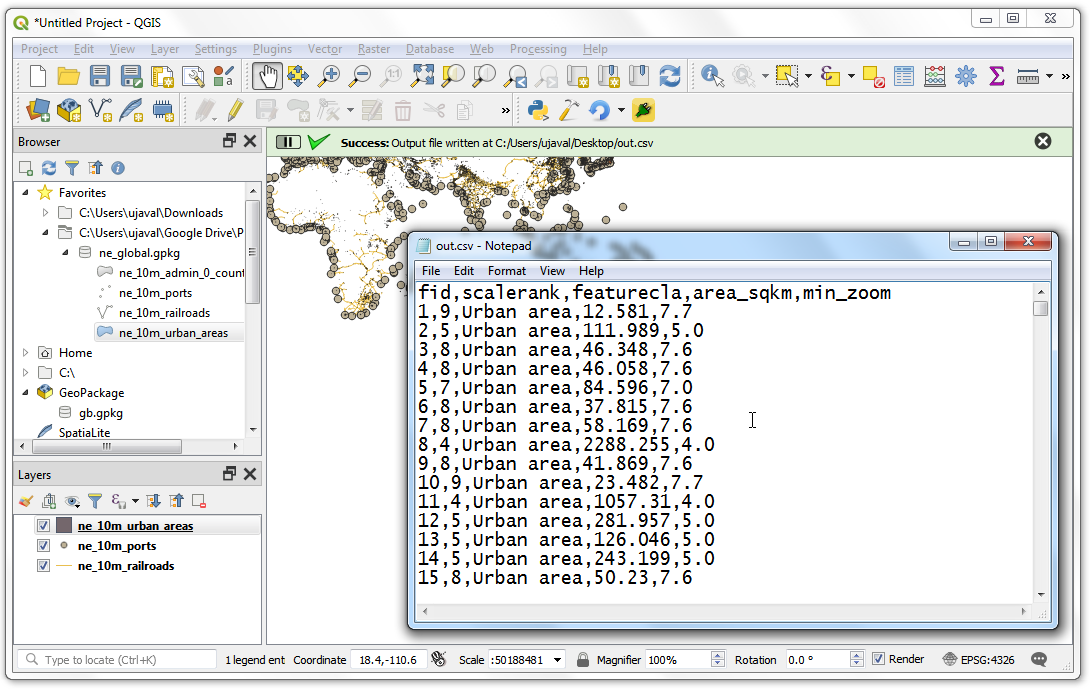
Now our plugin is ready. Reload the plugin and try it out. You will find that the output text file you chose will have the attributes from the vector layer.
You can zip the plugin directory and share it with your users. They can unzip the contents to their plugin directory and try out your plugin. If this was a real plugin, you would upload it to the QGIS Plugin Repository so that all QGIS users will be able to find and download your plugin.
Note
This plugin is for demonstration purpose only. Do not publish this plugin or upload it to the QGIS plugin repository.
Below is the full save_attributes.py file as a reference.
# -*- coding: utf-8 -*-
"""
/***************************************************************************
SaveAttributes
A QGIS plugin
This plugin saves the attributes of the selected vector layer as a CSV file.
Generated by Plugin Builder: http://g-sherman.github.io/Qgis-Plugin-Builder/
-------------------
begin : 2019-03-28
git sha : $Format:%H$
copyright : (C) 2019 by Ujaval Gandhi
email : ujaval@spatialthoughts.com
***************************************************************************/
/***************************************************************************
* *
* This program is free software; you can redistribute it and/or modify *
* it under the terms of the GNU General Public License as published by *
* the Free Software Foundation; either version 2 of the License, or *
* (at your option) any later version. *
* *
***************************************************************************/
"""
from PyQt5.QtCore import QSettings, QTranslator, qVersion, QCoreApplication
from PyQt5.QtGui import QIcon
from PyQt5.QtWidgets import QAction, QFileDialog
from qgis.core import QgsProject, Qgis
# Initialize Qt resources from file resources.py
from .resources import *
# Import the code for the dialog
from .save_attributes_dialog import SaveAttributesDialog
import os.path
class SaveAttributes:
"""QGIS Plugin Implementation."""
def __init__(self, iface):
"""Constructor.
:param iface: An interface instance that will be passed to this class
which provides the hook by which you can manipulate the QGIS
application at run time.
:type iface: QgsInterface
"""
# Save reference to the QGIS interface
self.iface = iface
# initialize plugin directory
self.plugin_dir = os.path.dirname(__file__)
# initialize locale
locale = QSettings().value('locale/userLocale')[0:2]
locale_path = os.path.join(
self.plugin_dir,
'i18n',
'SaveAttributes_{}.qm'.format(locale))
if os.path.exists(locale_path):
self.translator = QTranslator()
self.translator.load(locale_path)
if qVersion() > '4.3.3':
QCoreApplication.installTranslator(self.translator)
# Declare instance attributes
self.actions = []
self.menu = self.tr(u'&Save Attributes')
# Check if plugin was started the first time in current QGIS session
# Must be set in initGui() to survive plugin reloads
self.first_start = None
# noinspection PyMethodMayBeStatic
def tr(self, message):
"""Get the translation for a string using Qt translation API.
We implement this ourselves since we do not inherit QObject.
:param message: String for translation.
:type message: str, QString
:returns: Translated version of message.
:rtype: QString
"""
# noinspection PyTypeChecker,PyArgumentList,PyCallByClass
return QCoreApplication.translate('SaveAttributes', message)
def add_action(
self,
icon_path,
text,
callback,
enabled_flag=True,
add_to_menu=True,
add_to_toolbar=True,
status_tip=None,
whats_this=None,
parent=None):
"""Add a toolbar icon to the toolbar.
:param icon_path: Path to the icon for this action. Can be a resource
path (e.g. ':/plugins/foo/bar.png') or a normal file system path.
:type icon_path: str
:param text: Text that should be shown in menu items for this action.
:type text: str
:param callback: Function to be called when the action is triggered.
:type callback: function
:param enabled_flag: A flag indicating if the action should be enabled
by default. Defaults to True.
:type enabled_flag: bool
:param add_to_menu: Flag indicating whether the action should also
be added to the menu. Defaults to True.
:type add_to_menu: bool
:param add_to_toolbar: Flag indicating whether the action should also
be added to the toolbar. Defaults to True.
:type add_to_toolbar: bool
:param status_tip: Optional text to show in a popup when mouse pointer
hovers over the action.
:type status_tip: str
:param parent: Parent widget for the new action. Defaults None.
:type parent: QWidget
:param whats_this: Optional text to show in the status bar when the
mouse pointer hovers over the action.
:returns: The action that was created. Note that the action is also
added to self.actions list.
:rtype: QAction
"""
icon = QIcon(icon_path)
action = QAction(icon, text, parent)
action.triggered.connect(callback)
action.setEnabled(enabled_flag)
if status_tip is not None:
action.setStatusTip(status_tip)
if whats_this is not None:
action.setWhatsThis(whats_this)
if add_to_toolbar:
# Adds plugin icon to Plugins toolbar
self.iface.addToolBarIcon(action)
if add_to_menu:
self.iface.addPluginToVectorMenu(
self.menu,
action)
self.actions.append(action)
return action
def initGui(self):
"""Create the menu entries and toolbar icons inside the QGIS GUI."""
icon_path = ':/plugins/save_attributes/icon.png'
self.add_action(
icon_path,
text=self.tr(u'Save Attributes as CSV'),
callback=self.run,
parent=self.iface.mainWindow())
# will be set False in run()
self.first_start = True
def unload(self):
"""Removes the plugin menu item and icon from QGIS GUI."""
for action in self.actions:
self.iface.removePluginVectorMenu(
self.tr(u'&Save Attributes'),
action)
self.iface.removeToolBarIcon(action)
def select_output_file(self):
filename, _filter = QFileDialog.getSaveFileName(
self.dlg, "Select output file ","", '*.csv')
self.dlg.lineEdit.setText(filename)
def run(self):
"""Run method that performs all the real work"""
# Create the dialog with elements (after translation) and keep reference
# Only create GUI ONCE in callback, so that it will only load when the plugin is started
if self.first_start == True:
self.first_start = False
self.dlg = SaveAttributesDialog()
self.dlg.pushButton.clicked.connect(self.select_output_file)
# Fetch the currently loaded layers
layers = QgsProject.instance().layerTreeRoot().children()
# Clear the contents of the comboBox and lineEdit from previous runs
self.dlg.comboBox.clear()
self.dlg.lineEdit.clear()
# Populate the comboBox with names of all the loaded layers
self.dlg.comboBox.addItems([layer.name() for layer in layers])
# show the dialog
self.dlg.show()
# Run the dialog event loop
result = self.dlg.exec_()
# See if OK was pressed
if result:
filename = self.dlg.lineEdit.text()
with open(filename, 'w') as output_file:
  selectedLayerIndex = self.dlg.comboBox.currentIndex()
  selectedLayer = layers[selectedLayerIndex].layer()
  fieldnames = [field.name() for field in selectedLayer.fields()]
  # write header
  line = ','.join(name for name in fieldnames) + '\n'
  output_file.write(line)
  # write feature attributes
  for f in selectedLayer.getFeatures():
    line = ','.join(str(f[name]) for name in fieldnames) + '\n'
    output_file.write(line)
self.iface.messageBar().pushMessage(
  "Success", "Output file written at " + filename,
  level=Qgis.Success, duration=3)
If you want to give feedback or share your experience with this tutorial, please comment below. (requires GitHub account)