 Ujaval Gandhi
Running and Scheduling QGIS Processing Jobs
You can automate a lot of tasks in QGIS using Python scripting (PyQGIS) and the Processing Framework. Most of the time, you would run these scripts manually while QGIS is open. While that is helpful, many times you need a way to run this jobs via the command-line and without needing to open QGIS. Fortunately, you can write standalone python scripts that use QGIS libraries and can be run via the command-line. In this tutorial, we will learn how to write and schedule a job that uses the QGIS Processing framework.
Overview of the task
Let’s say we are working on some analysis using shapefiles of a region. The shapefiles are updated on a daily basis and we always need the latest file. But before we can use these files, we need to cleanup the data. We can setup a QGIS job that automates this process and runs it daily so you have the latest cleaned up shapefiles for your work. We will write a standalone Python script that downloads a shapefile and run topological cleaning operations on a daily basis.
Other skills you will learn
Downloading and unzipping files using Python.
Running any Processing algorithm via PyQGIS.
Fixing topological errors in a vector layer.
Get the data
Geofabrik provides daily updated shapefiles of OpenStreetMap datasets.
We will use shapefiles for Fiji for this exercise. Download the fiji-latest.shp.zip and unzip it to a folder on your disk.
Data Source [GEOFABRIK]
Procedure
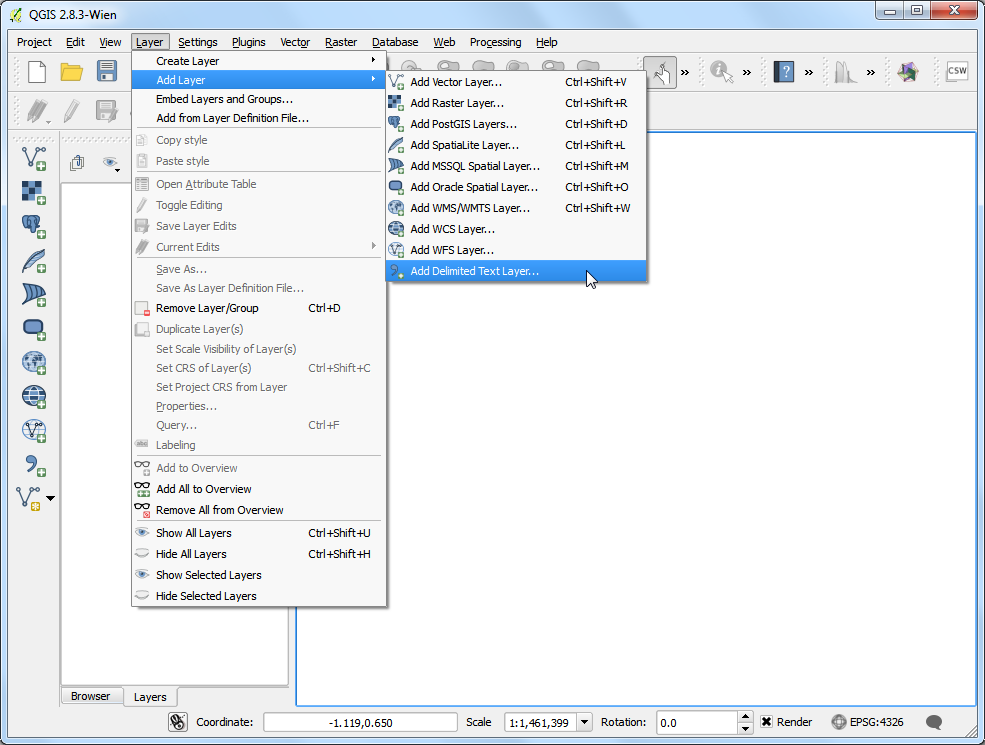
We will first run through the process of cleaning the shapefile manually to note the commands that we will use in the python script. Launch QGIS and go to .
Browse to the folder containing the unzipped shapefiles and select the
roads.shpfile and click Open.
First we must re-project the roads layer to a Projected CRS. This will allow us to use meters as units when performing analysis instead of degrees. Open .
Search for the Reproject layer tool. Double-click it to launch the dialog.

In the Reproject layer dialog, select the
roadslayer as Input layer. We will useEPSG:3460 Fiji 1986 / Fiji Map GridCRS as the Target CRS. Click Run.
Once the process finishes, you will see the reprojected layer loaded in QGIS. Go to .
In the History and Log dialog, expand the Algorithm folder and select the latest entry. You will see the full processing command shown in the bottom panel. Note this command for use in our script.
Back in the main QGIS Window, click at the CRS button in the bottom-right corner.
In the Project Properties | CRS dialog, check the Enable on-the-fly CRS transformation and select
EPSG:3460 Fiji
1986 / Fiji Map Grid
as the CRS. This will ensure that our original and reprojected layers will line up correctly.
Now we will run the cleaning operation. GRASS has a very powerful set of topological cleaning tools. These are available in QGIS via the
v.cleanalgorithm. Search for this algorithm in the Processing Toolbox and double-click it to launch the dialog.
You can read more about various tools and options in the Help tab. For this tutorial, we will be using the
snaptool to remove duplicate vertices that are within 1 meter of each other. SelectReprojected layeras the Layer to clean. Choosesnapas the Cleaning tool. Enter1.00as the Threshold. Leave the other fields blank and click Run.
Once the processing finishes, you will see 2 new layers added to QGIS. The
Cleaned vector layeris the layer with topological errors corrected. You will also have aErrors layerwhich will highlight the features which were repaired. You can use the errors layer as a guide and zoom in to see vertices that were removed.
Go to dialog and note the full processing command for later use.
We are ready to start coding now. See the A Text Editor or a Python IDE section in the Building a Python Plugin tutorial for instructions to setup your text editor or IDE. For running standalone python scripts that use QGIS, we must set various configuration options. A good way to run standalone scripts is to launch them via a
.batfile. This file will first set the correct configuration options and then call the python script. Create a new file namedlaunch.batand enter the following text. Change the values according to your QGIS configuration. Don’t forget to replace the username with your own username in the path to the python script. The paths in this file will be the same on your system if you installed QGIS via theOSGeo4W Installer. Save the file on your Desktop.
Opomba
Linux and Mac users will need to create a shell script to set the paths and environment variables.
REM Change OSGEO4W_ROOT to point to the base install folder
SET OSGEO4W_ROOT=C:\OSGeo4W64
SET QGISNAME=qgis
SET QGIS=%OSGEO4W_ROOT%\apps\%QGISNAME%
set QGIS_PREFIX_PATH=%QGIS%
REM Gdal Setup
set GDAL_DATA=%OSGEO4W_ROOT%\share\gdal\
REM Python Setup
set PATH=%OSGEO4W_ROOT%\bin;%QGIS%\bin;%PATH%
SET PYTHONHOME=%OSGEO4W_ROOT%\apps\Python27
set PYTHONPATH=%QGIS%\python;%PYTHONPATH%

REM Launch python job
python c:\Users\Ujaval\Desktop\download_and_clean.py
pause

Create a new python file and enter the following code. Name the file as
download_and_clean.pyand save it on your Desktop.
from qgis.core import *
print 'Hello QGIS!'
Switch to your Desktop and locate the
launch.baticon. Double-click it to launch a new command window and run the script. If you seeHello QGIS!printed in the command window, your configuration and setup worked fine. If you see errors or do not see the text, check yourlaunch.batfile and make sure all the paths match the locations on your system.

Back in your text editor, modify the
download_and_clean.pyscript to add the following code. This is the bootstrap code to initialize QGIS. These are unnecessary if you are running the script within QGIS. But since we are running it outside QGIS, we need to add these at the beginning. Make sure you replace the username with your username. After making these changes, save the file and runlaunch.batagain. If you seeHello QGIS!printed, you are all set to do add the processing logic to the script.
import sys
from qgis.core import *

# Initialize QGIS Application
QgsApplication.setPrefixPath("C:\\OSGeo4W64\\apps\\qgis", True)
app = QgsApplication([], True)
QgsApplication.initQgis()

# Add the path to Processing framework
sys.path.append('c:\\Users\\Ujaval\\.qgis2\\python\\plugins')

# Import and initialize Processing framework
from processing.core.Processing import Processing
Processing.initialize()
import processing

print 'Hello QGIS!'
Recall the first processing command that we had saved from the log. This was the command to re-project a layer. Paste the command to your script and add the surrounding code as follows. Note that processing commands return the path to the output layers as a dictionary. We are storing this as the
retvalue and printing the path to the reprojected layer.
roads_shp_path = "C:\\Users\\Ujaval\\Downloads\\fiji-latest.shp\\roads.shp"
ret = processing.runalg('qgis:reprojectlayer', roads_shp_path, 'EPSG:3460',
None)
output = ret['OUTPUT']
print output
Run the script via
launch.batand you will see the path to the newly created reprojected layer.
Now add the code for cleaning the topology. Since this is our final output, we will add the output file paths as the last 2 arguments for the
grass.v.cleanalgorithm. If you left these blank, the output will be created in a temporary directory.
processing.runalg("grass:v.clean",
                  output,
                  1,
                  1,
                  None,
                  -1,
                  0.0001,
                  'C:\\Users\\Ujaval\\Desktop\\clean.shp',
                  'C:\Users\\Ujaval\\Desktop\\errors.shp')
Run the script and you will see 2 new shapefiles created on your Desktop. This completes the processing part of the script. Let’s add the code to download the data from the original website and unzip it automatically. We will also store the path to the unzipped file in a variable that we can pass to the processing algorithm later. We will need to import some additional modules for doing this. (See the end of the tutorial for the full script with all the changes)
import os
import urllib
import zipfile
import tempfile

temp_dir = tempfile.mkdtemp()
download_url = 'http://download.geofabrik.de/australia-oceania/fiji-latest.shp.zip'
print 'Downloading file'
zip, headers = urllib.urlretrieve(download_url)
with zipfile.ZipFile(zip) as zf:
    files = zf.namelist()
    for filename in files:
        if 'roads' in filename:
            file_path = os.path.join(temp_dir, filename)
            f = open(file_path, 'wb')
            f.write(zf.read(filename))
            f.close()
            if filename == 'roads.shp':
                roads_shp_path = file_path
Run the completed script. Everytime you run the script, a fresh copy of the data will be downloaded and processed.
To automate running on this script on a daily basis, we can use the
Task
Scheduler
in Windows. Launch the Task Scheduler and click Create Basic Task.
Opomba
Linux and Mac users can use cron jobs to schedule tasks.
Name the task as
Daily Download and Cleanupand click Next.
Select
Dailyas the Trigger and click Next
Select a time as per your liking and click Next.
Choose
Start a programas the Action and click Next.
Click Browse and locate the
launch.batscript. Click Next.
Click Finish at the last screen to schedule the task. Now the script will automatically launch at the specified time to give you a fresh copy of cleaned data everyday.
Below is the full download_and_clean.py script for your reference.
import sys
from qgis.core import *

import os
import urllib
import zipfile
import tempfile

# Initialize QGIS Application
QgsApplication.setPrefixPath("C:\\OSGeo4W64\\apps\\qgis", True)
app = QgsApplication([], True)
QgsApplication.initQgis()

# Add the path to Processing framework
sys.path.append('c:\\Users\\Ujaval\\.qgis2\\python\\plugins')

# Import and initialize Processing framework
from processing.core.Processing import Processing
Processing.initialize()
import processing

# Download and unzip the latest shapefile
temp_dir = tempfile.mkdtemp()
download_url = 'http://download.geofabrik.de/australia-oceania/fiji-latest.shp.zip'
print 'Downloading file'
zip, headers = urllib.urlretrieve(download_url)
with zipfile.ZipFile(zip) as zf:
    files = zf.namelist()
    for filename in files:
        if 'roads' in filename:
            file_path = os.path.join(temp_dir, filename)
            f = open(file_path, 'wb')
            f.write(zf.read(filename))
            f.close()
            if filename == 'roads.shp':
                roads_shp_path = file_path

print 'Downloaded file to %s' % roads_shp_path

# Reproject the Roads layer
print 'Reprojecting the roads layer'

ret = processing.runalg('qgis:reprojectlayer', roads_shp_path, 'EPSG:3460', None)
output = ret['OUTPUT']

# Clean the Roads layer
print 'Cleaning the roads layer'

processing.runalg("grass:v.clean",
                  output,
                  1,
                  1,
                  None,
                  -1,
                  0.0001,
                  'C:\\Users\\Ujaval\\Desktop\\clean.shp',
                  'C:\Users\\Ujaval\\Desktop\\errors.shp')
print 'Success'