 Ujaval Gandhi
以 Python 製作附加元件 (QGIS3)
增進 QGIS 功能的最佳方法,就是使用附加元件。你也可以使用 Python 來寫一個,從只有一個按鈕到複雜的功能面板,都可任君挑選。本教學會介紹設計附加元件的大致流程,包括設置開發環境、打造使用者介面,以及撰寫程式碼與 QGIS 互動。有關較為基礎的部分,請參閱 Python 程式設計的初步上手 (QGIS3)。
備註
If you are building a new plugin, I strongly recommend building a Processing Plugin instead of the GUI plugin described in this tutorial. See Building a Processing Plugin (QGIS3) for details.
內容說明
我們要開發一個簡單的附加元件,稱為 Save Attributes,它可以讓使用者任意挑選一個向量圖層,把它的屬性另存為 CSV 檔。
取得工具
Qt Creator
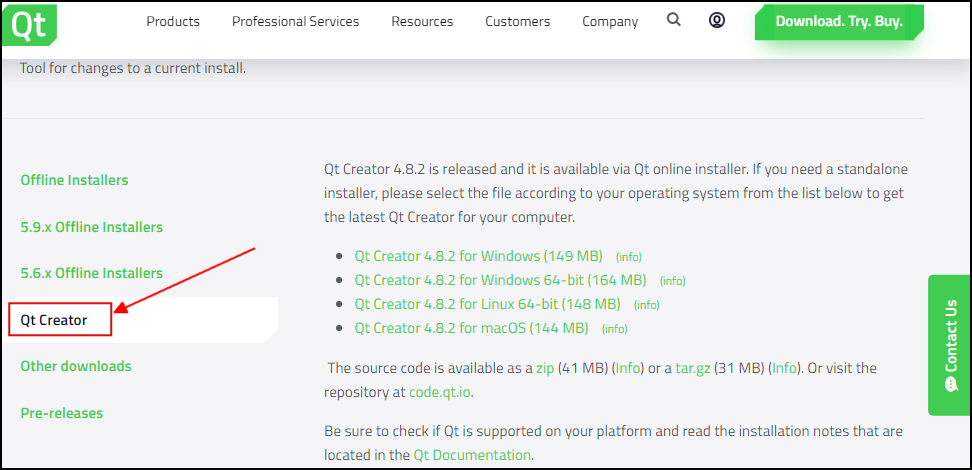
Qt 是一套軟體開發框架,用於設計在 Windows、Mac、Linux 或是其他行動作業系統上執行的軟體。QGIS 本身就是用 Qt 框架打造的,所以我們在這裡要使用一個稱為 Qt Creator 的程式來設計我們附加元件的介面。
Download and install the Qt Creator installer from Qt Offline Installers. Make sure you select Qt Creator on the download page. Note that you will have to create a free Qt account to install the package.
備註
OSGeo4w installer for QGIS on Windows include a copy of Qt Designer program which is a lightweight version of Qt Creator and perfectly suitable for building plugins. You may skip downloading Qt Creator and use it instead from .
Qt 的 Python Bindings
由於我們要使用 Python 來設計附加元件,因此得安裝 Qt 的 Python binding ,以便在 Python 中可以輕鬆使用 Qt 的功能。此步驟會因作業系統的不同而不同,像是 Windows 命令列下,要裝的程式叫做 pyrcc5。
Windows
Relevant python bindings are included in the QGIS install on Windows. But to use them from the plugin folder, we need to indicate the path to the QGIS install.
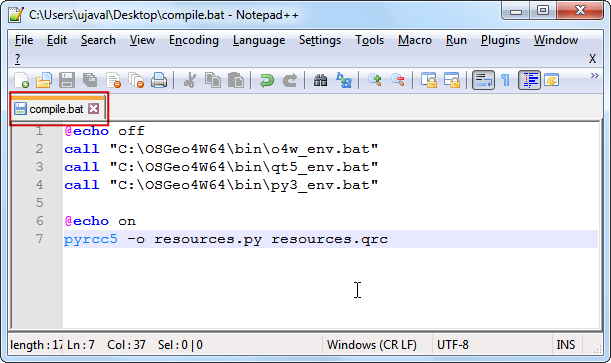
Create a Windows Batch file (.bat extension) with the following content and save it on your computer as compile.bat. We will later copy this file to the plugin folder. If you installed QGIS at a different path, replace the C:\OSGeo4W64\bin\ with your path.
@echo off
call "C:\OSGeo4W64\bin\o4w_env.bat"
call "C:\OSGeo4W64\bin\qt5_env.bat"
call "C:\OSGeo4W64\bin\py3_env.bat"

@echo on
pyrcc5 -o resources.py resources.qrc
Mac
安裝 Homebrew 套件管理員,然後使用以下指令安裝 PyQt 套件:
brew install pyqt
- Linux
在你的發行版中尋找並安裝
python-qt5套件。在 Ubuntu 和其他基於 Debian 的發行版中,可以使用如下指令:
sudo apt-get install python-qt5
備註
You may find that QGIS has already installed this package.
編輯器或 Python IDE
要進行任何種類的軟體開發,優良的文字編輯器是必不可少的。在本教學中,你可以使用你喜歡的文字編輯器或 IDE (整合開發環境);如果沒有的話,每個作業系統都有很多免費或付費的文字編輯軟體可使用,挑一個符合你需求的即可。
本教學中使用的是 Windows 版本的 Notepad++ 編輯器。
Windows
Notepad++ 是一款好用且免費的編輯器,可安裝於 Windows 下。下載並安裝 Notepad++ editor
備註
If you are using Notepad++, makes sure to go to and enable Replace by space. Python is very sensitive about whitespace and this setting will ensure tabs and spaces are treated properly.
附加元件「Plugin Builder」
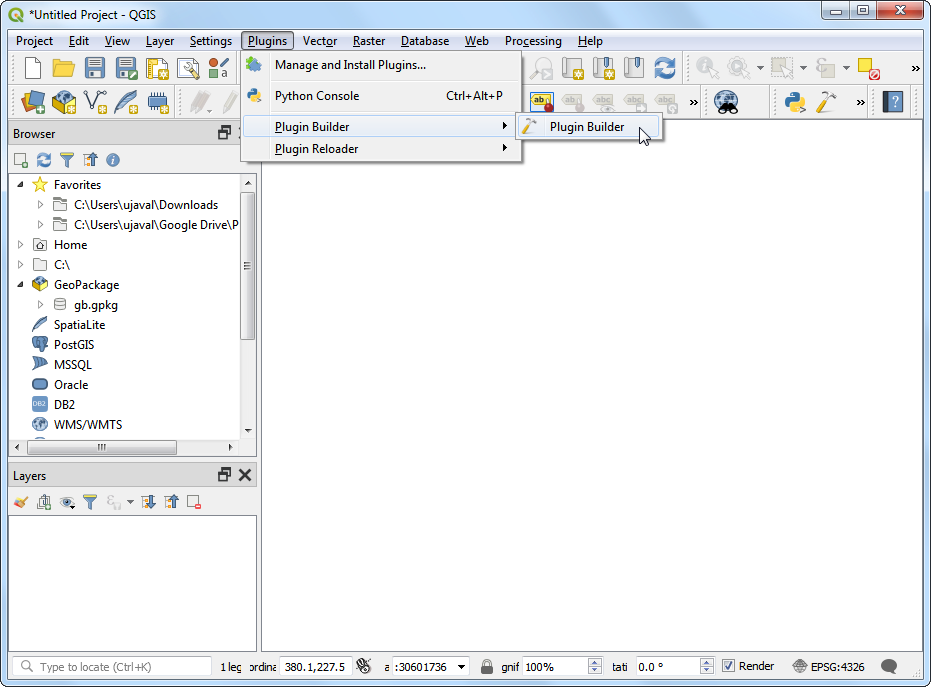
QGIS 有個實用的 Plugin Builder 附加元件,它可以創造附加元件所需檔案和樣板設計的代碼。請尋找並安裝 Point Sampling Tool 附加元件,安裝細節請參考 使用附加元件。
附加元件「Plugin Reloader」
還有一個實用的附加元件,可以讓我們反覆測試不斷更新的附加元件。使用此元件,可以在改變附加元件的程式碼之後,不用重新啟動 QGIS 就能讀取程式碼修改的部分。請尋找並安裝 Plugin Reloader 附加元件,安裝細節請參考 使用附加元件。
備註
Plugin Reloader 屬於實驗性的附加元件,所以如果你找不到它,請確認你已在 附加元件的設定分頁 中勾選了 顯示實驗性質的附加元件。
操作流程
開啟 QGIS,選擇 。
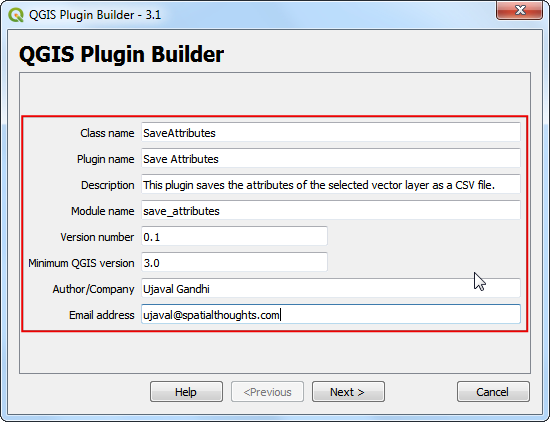
You will see the QGIS Plugin Builder dialog with a form. You can fill the form with details relating to our plugin. The Class name will be the name of the Python Class containing the logic of the plugin. This will also be the name of the folder containing all the plugin files. Enter
SaveAttributesas the class name. The Plugin name is the name under which your plugin will appear in the Plugin Manager. Enter the name asSave Attributes. Add a description in the Description field. The Module name will be the name of the main python file for the plugin. Enter it assave_attributes. Leave the version numbers as they are and enter your name and email address in the appropriate fields. Click Next.
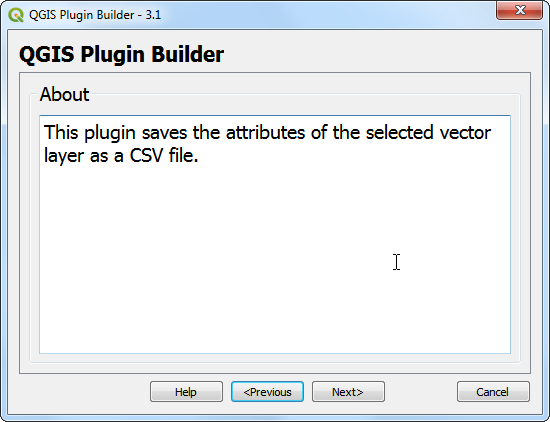
Enter a brief description of the plugin for the About dialog and click Next.
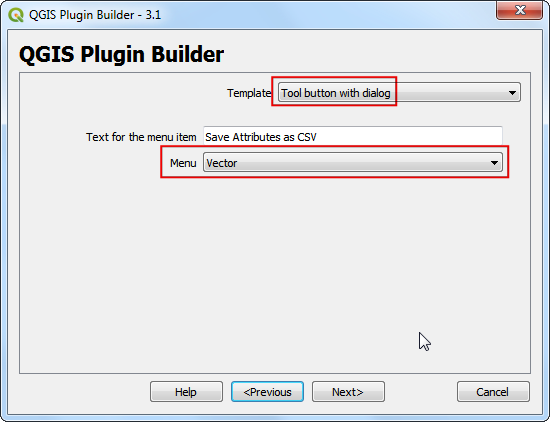
Select the
Tool button with dialogfrom the Template selector`. The Text for menu item value will be how the users will find your plugin in QGIS menu. Enter it asSave Attributes as CSV. The Menu field will decide where your plugin item is added in QGIS. Since our plugin is for vector data, selectVector. Click Next.
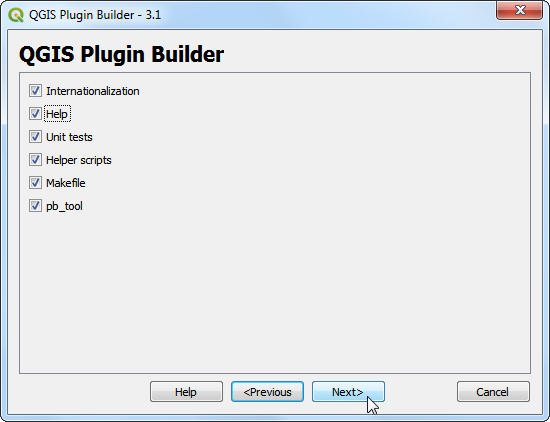
Plugin builder will prompt you for the type of files to generate. Keep the default selection and click Next.
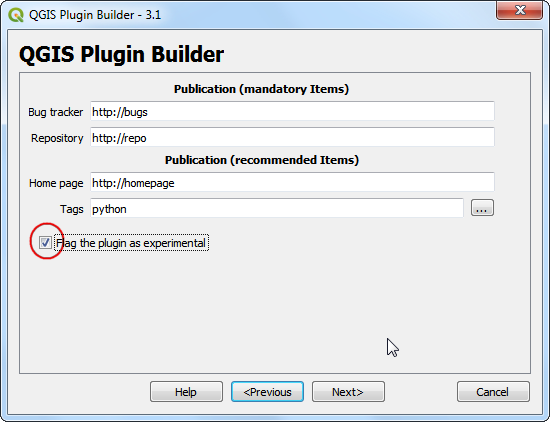
As we do not intend to publish the plugin, you may leave the Bug tracker, Repository and Home page values to default. Check the Flag the plugin as experimental box at the bottom and click Next.
You will be prompted to choose a directory for your plugin. For now, save it to a directory you can locate easily on your computer and click Generate.
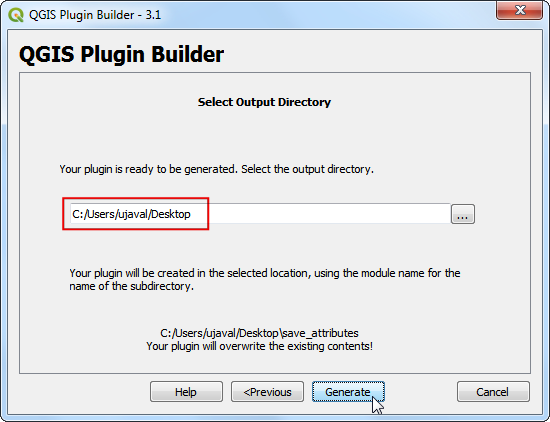
Next, press the generate button. You will see a confirmation dialog once your plugin template is created.

備註
You may get a prompt saying that pyrcc5 is not found in the path. You can ignore this message.
Before we can use the newly created plugin, we need to compile the
resources.qrcfile that was created by Plugin Builder. This file is part of the Qt Resource System which references all binary files used in the plugin. For this plugin, it will only have the plugin icon. Compiling this file generates application code that can be used in the plugin independent which platform the plugin is being run. Follow the platform specific instruction for this step.
Windows
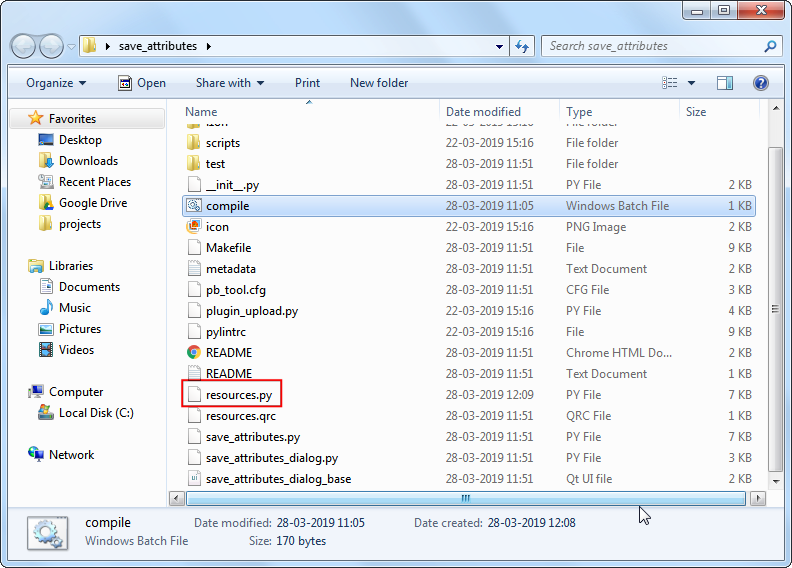
You can now copy the compile.bat file (created during the Python Bindings for Qt section at the start) to the plugin folder. Once copied, double-click the file to run it. If the run was successful, you will see a new file called resources.py in the folder.
備註
If this step fails, you can launch cmd.exe and browse to the plugin folder using cd command. Run the Batch file by running compile.bat to see the error.
Mac 和 Linux
You will need to install pb_tool first. Open a Terminal and install it via pip.
sudo pip3 install pb_tool
Open a Terminal and go to the plugin directory and type pb_tool compile. This will run the pyrcc5 command that we had installed as part Python Bindings for Qt section.
pb_tool compile
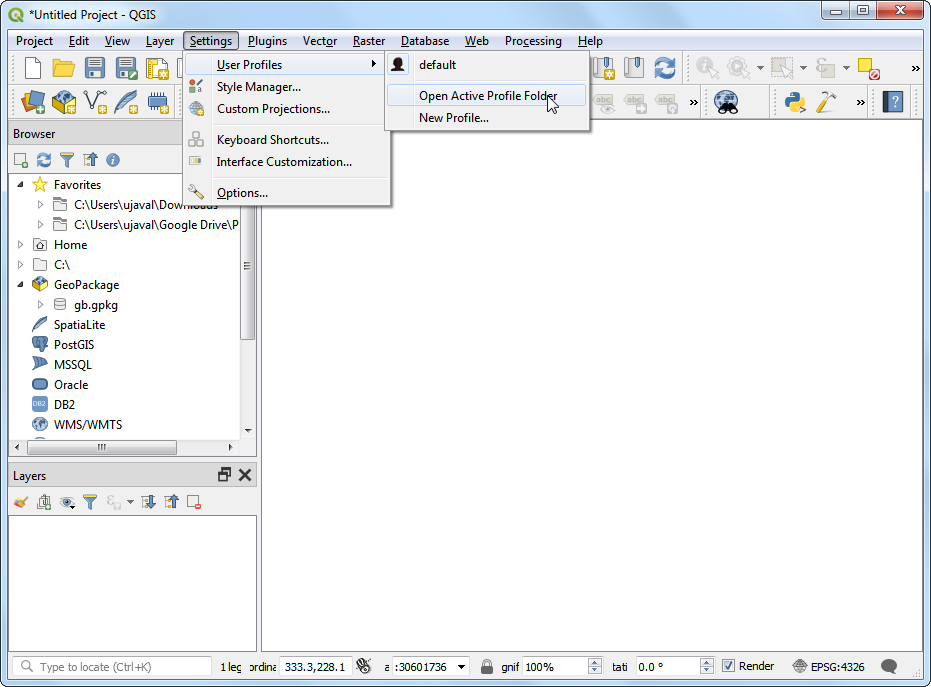
Plugins in QGIS are stored in a special folder. We must copy our plugin directory to that folder before it can be used. In QGIS, locate your current profile folder by going to .
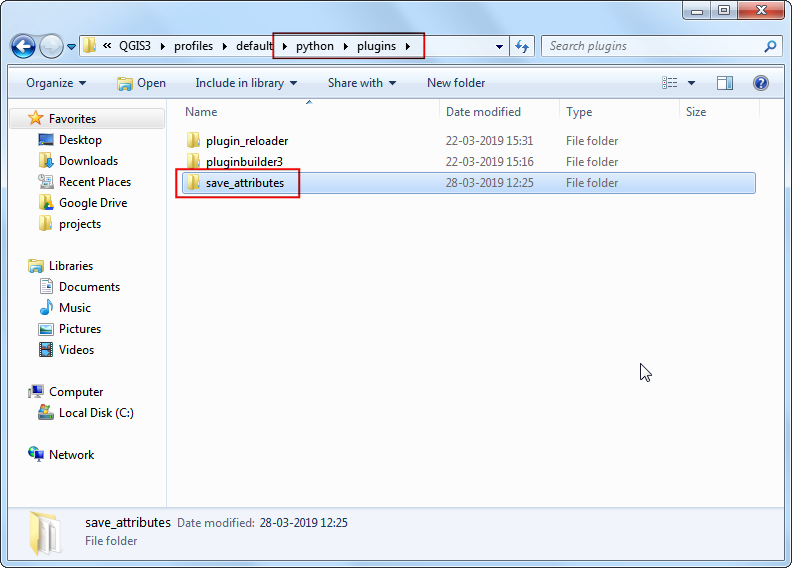
In the profile folder, copy the plugin folder to subfolder.
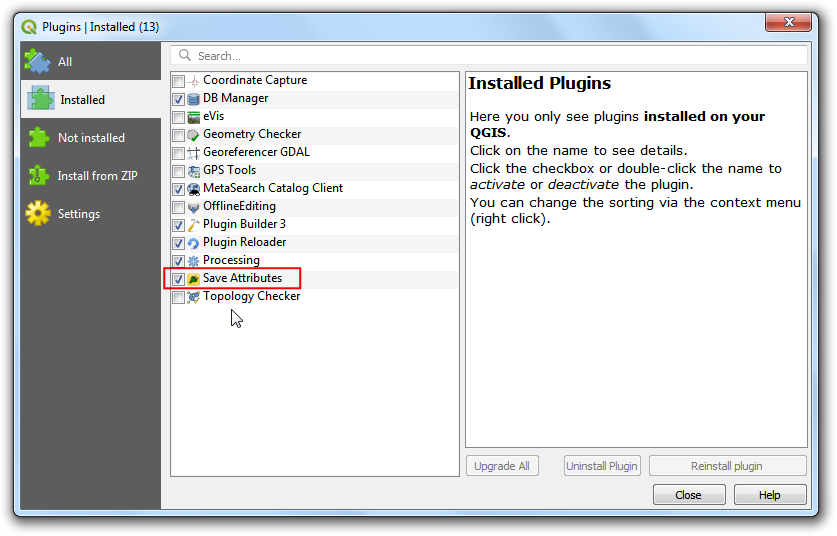
Now we are ready to have a first look at the brand new plugin we created. Close QGIS and launch it again. Go to and enable the
Save Attributesplugin in the Installed tab.
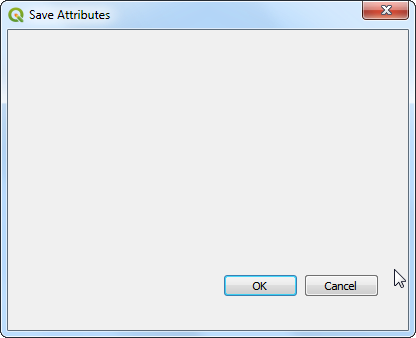
You will notice that there is a new icon in the plugin toolbar and a new menu entry under . Select it to launch the plugin dialog.
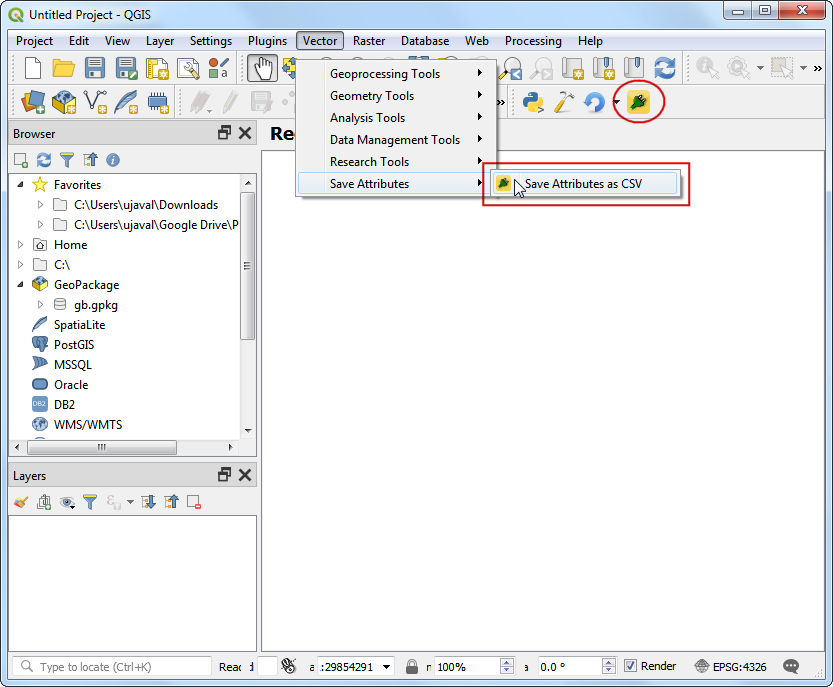
你會看到一個叫做 Save Attributes 的視窗出現。可以關掉了。
We will now design our dialog box and add some user interface elements to it. Open the
Qt Creatorprogram and go to .
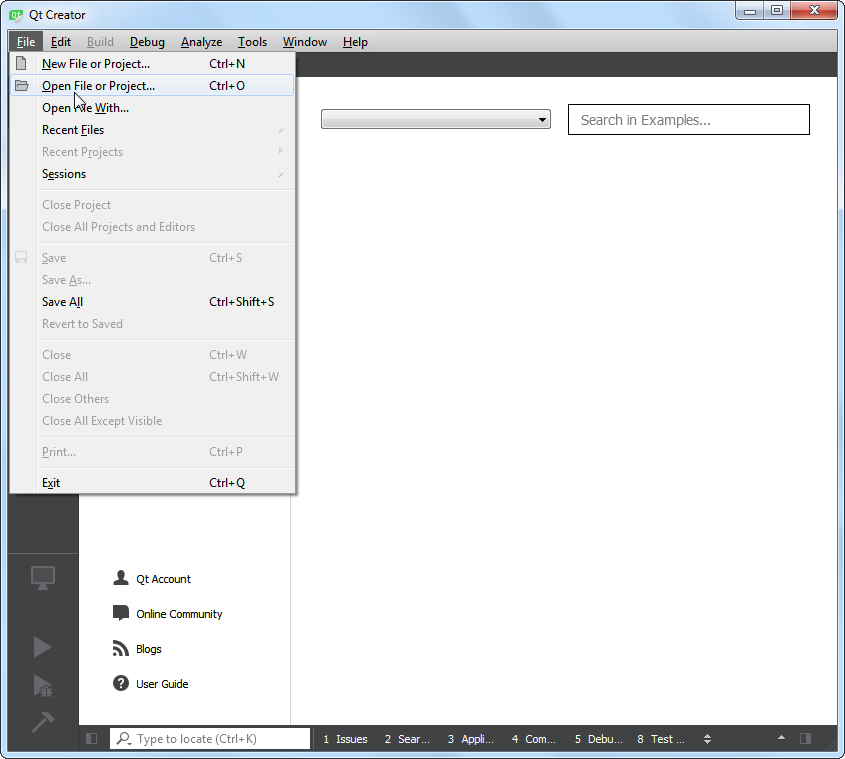
前往附加元件的資料夾,選擇檔案
save_attributes_dialog_base.ui,然後按 開啟。
備註
Windows hides the AppData folder so you may not see it in the file selector dialog. You can enter AppData in the File name prompt from its parent directory to open it.
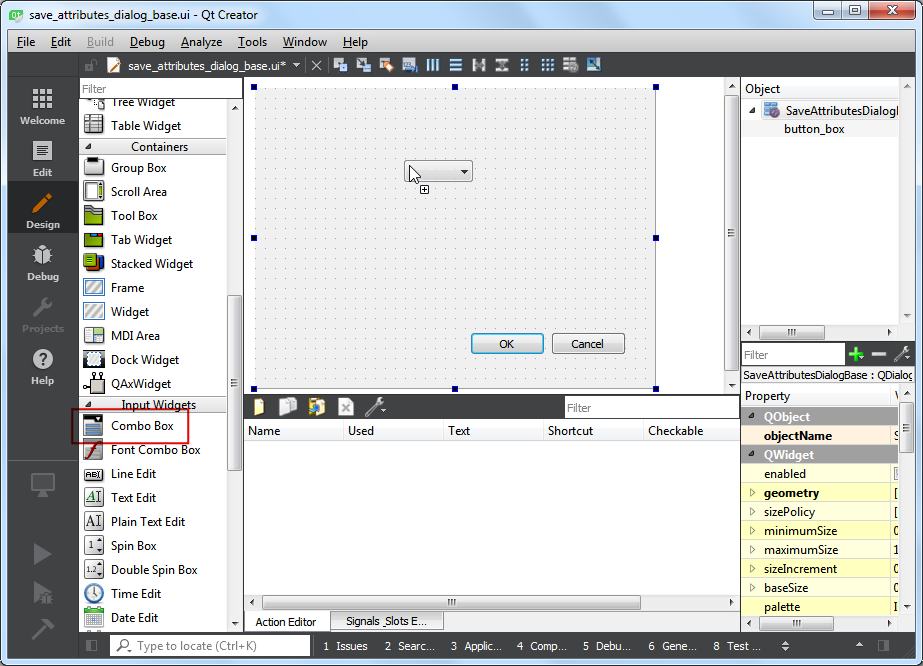
附加元件的空白視窗就會在這裡出現。你可以從左邊的面板中拖曳加入視窗中的一些元件,這裡我們要加上 Input Widgets 中的 Combo Box(組合框),把它拖曳到附加元件的視窗中。
調整組合框的大小,然後再從 Display Widget 中拖曳一個 Label(標籤)到視窗上。
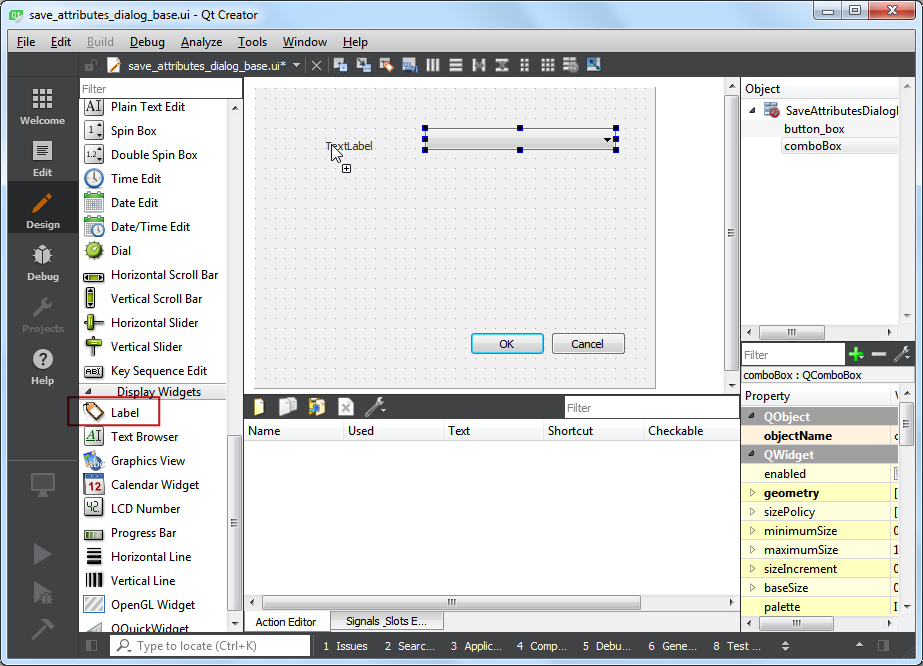
點選標籤的文字然後輸入
Select a layer。
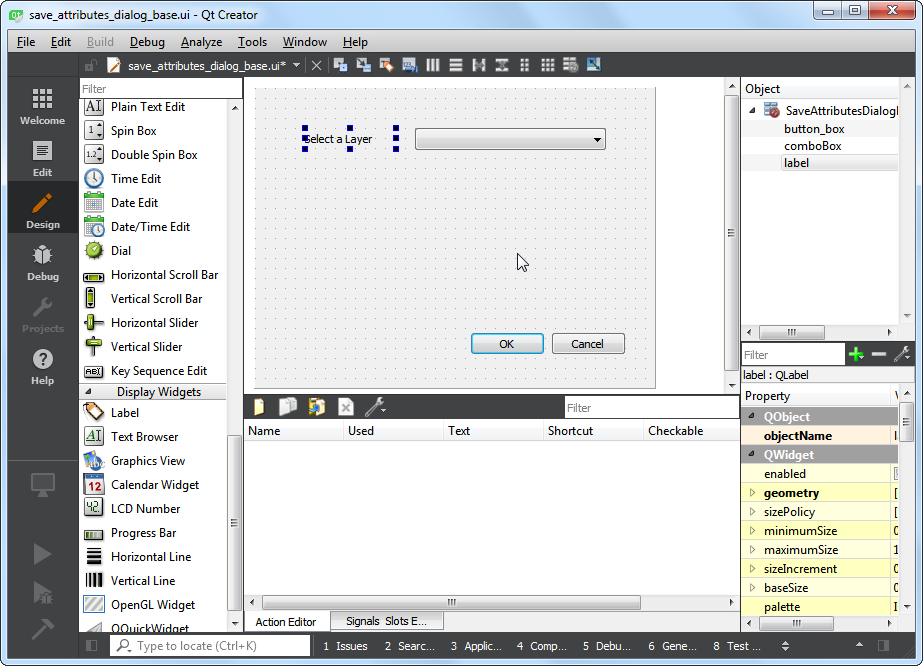
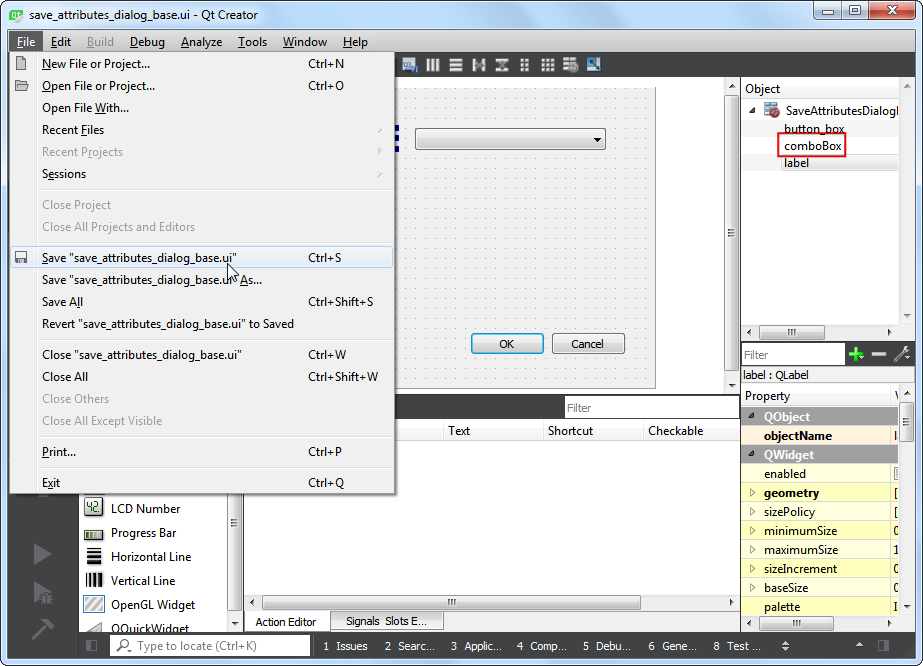
選擇 ,以儲存檔案。注意組合框目前的物件名稱為
comboBox,如果要使用 Python 操作物件,我們需要記住物件的名稱才行。
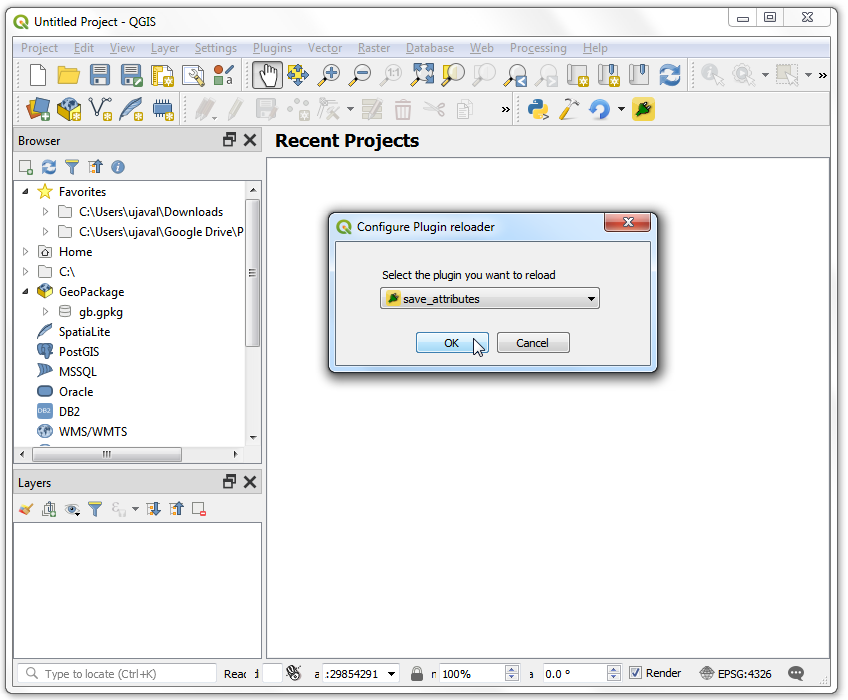
Let's reload our plugin so we can see the changes in the dialog window. Go to . Select
SaveAttributesin the Configure Plugin reloader dialog.
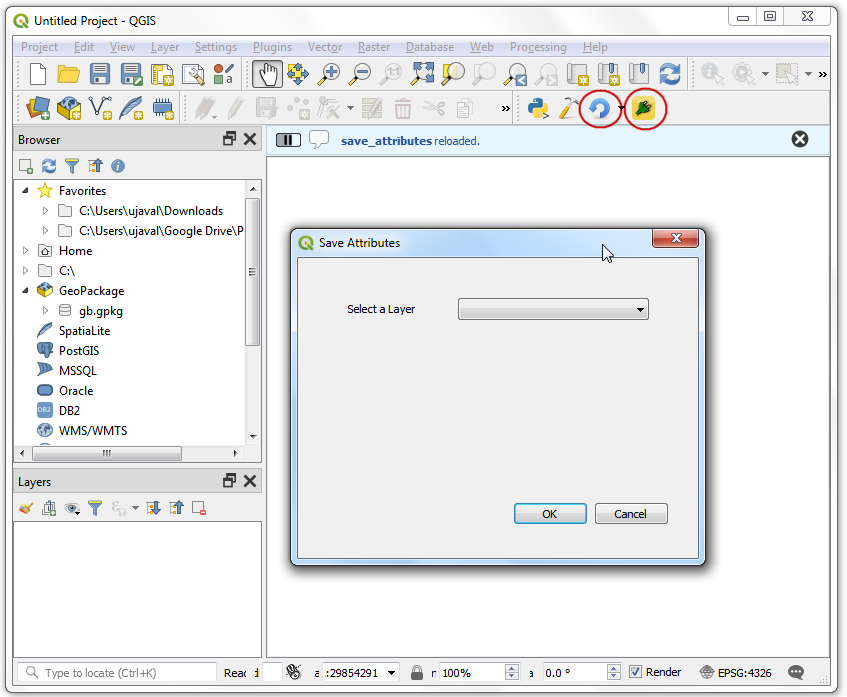
Click the Reload plugin button to load the latest version of the plugin. Click the Save Attributes as CSV button to open the newly designed dialog box.
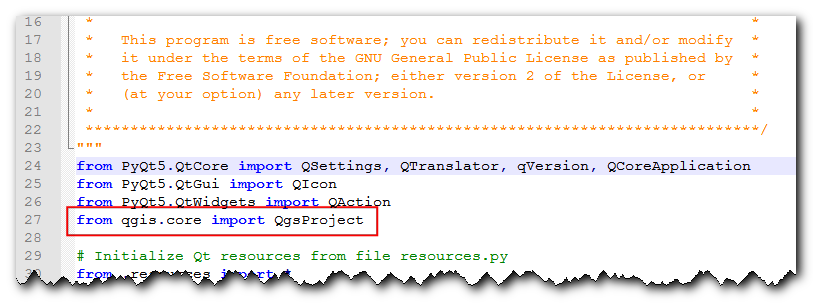
Let's add some logic to the plugin that will populate the combo box with the layers loaded in QGIS. Go to the plugin directory and load the file
save_attributes.pyin a text editor. First, insert at the top of the file with the other imports:from qgis.core import QgsProject
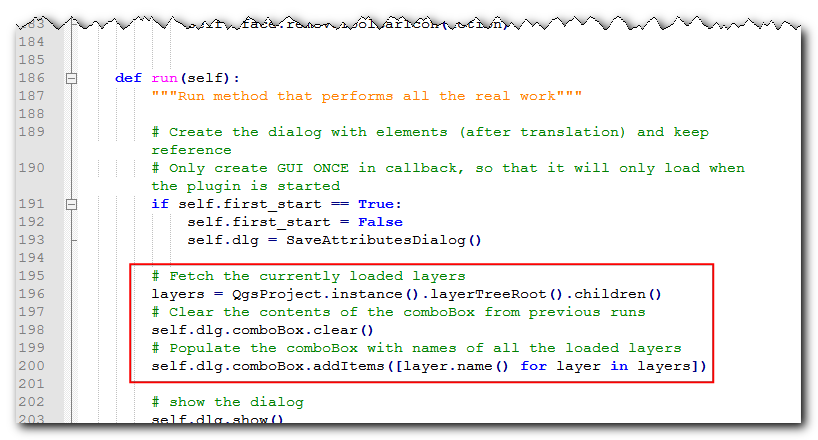
Then scroll down to the end and find the
run(self)method. This method will be called when you click the toolbar button or select the plugin menu item. Add the following code at the beginning of the method. This code gets the layers loaded in QGIS and adds it to thecomboBoxobject from the plugin dialog.# Fetch the currently loaded layers layers = QgsProject.instance().layerTreeRoot().children() # Clear the contents of the comboBox from previous runs self.dlg.comboBox.clear() # Populate the comboBox with names of all the loaded layers self.dlg.comboBox.addItems([layer.name() for layer in layers])
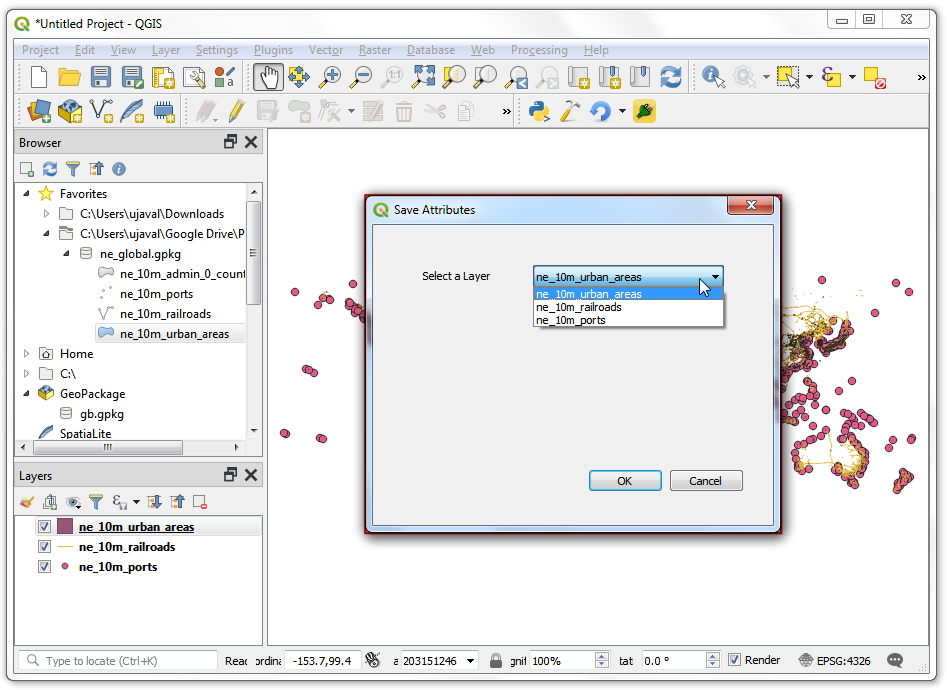
Back in the main QGIS window, reload the plugin by clicking on the Reload plugin button. To test this new functionality, we must load some layers in QGIS. After you have loaded some layers, launch the plugin by going to . You will see that our combo box is now populated with the layer names that are loaded in QGIS.
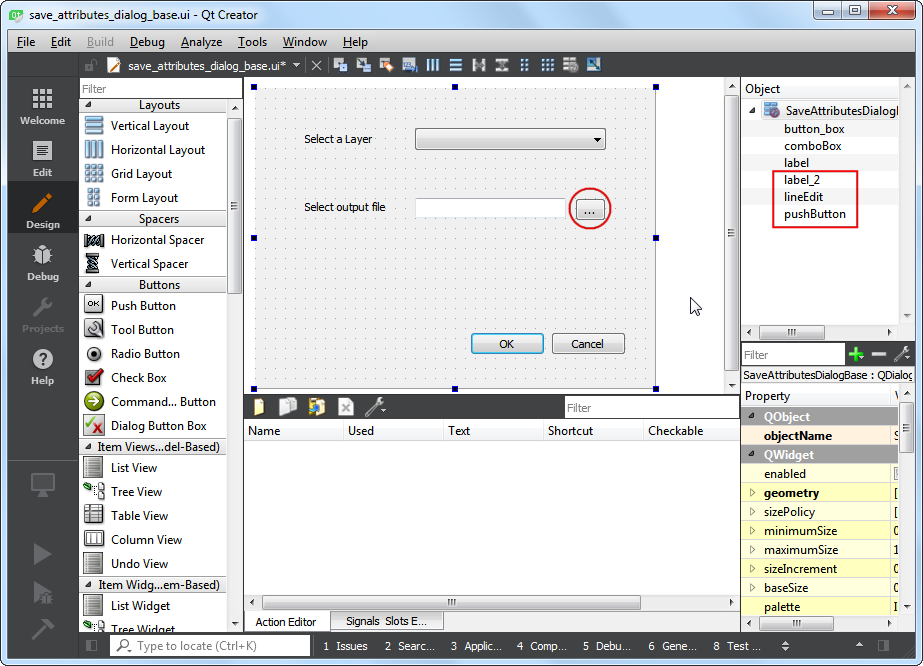
讓我們把剩下的使用者介面元素也添加進來。回到 Qt Creator 然後載入
save_attributes_dialog_base.ui,再從 Display Widget 加入一個Label,然後文字改為Select output file,接著從 Input Widget 加入LineEdit,他會秀出使用者選擇的輸出檔檔名;再來從 Button 加入一個Push Button(按鈕),然後把按鈕的標籤改為...。記住這些物件的名字,我們要使用它們與物件本體互動。最後請存檔。
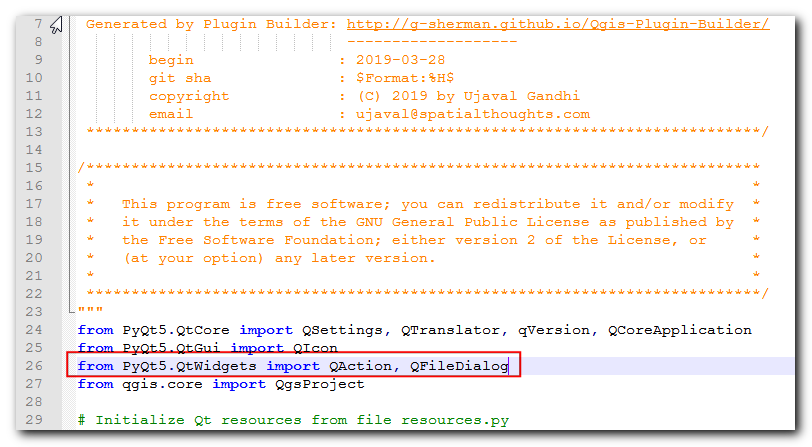
We will now add python code to open a file browser when the user clicks the
...push button and show the select path in the line edit widget. Open thesave_attributes.pyfile in a text editor. AddQFileDialogtoQtWidgetslist of imports at the top of the file.
Add a new method called
select_output_filewith the following code. This code will open a file browser and populate the line edit widget with the path of the file that the user chose. Note, howgetSaveFileNamereturns a tuple with the filename and the filter used.
def select_output_file(self):
  filename, _filter = QFileDialog.getSaveFileName(
    self.dlg, "Select   output file ","", '*.csv')
  self.dlg.lineEdit.setText(filename)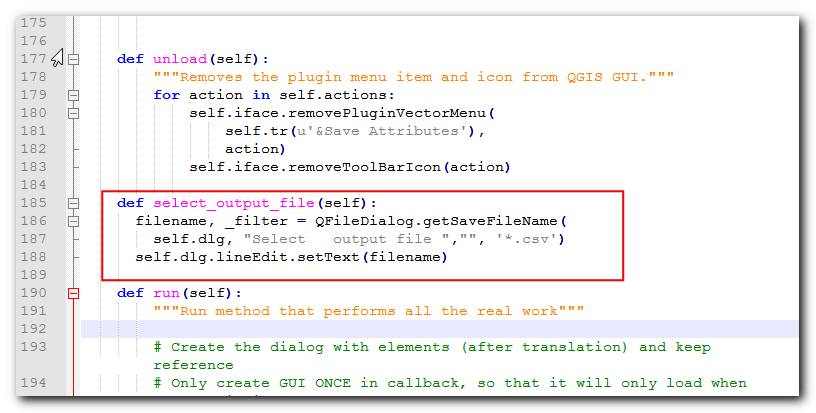
Now we need to add code so that when the ... button is clicked,
select_output_filemethod is called. Scroll down to therunmethod and add the following line in the block where the dialog is initialized. This code will connect theselect_output_filemethod to theclickedsignal of the push button widget.
self.dlg.pushButton.clicked.connect(self.select_output_file)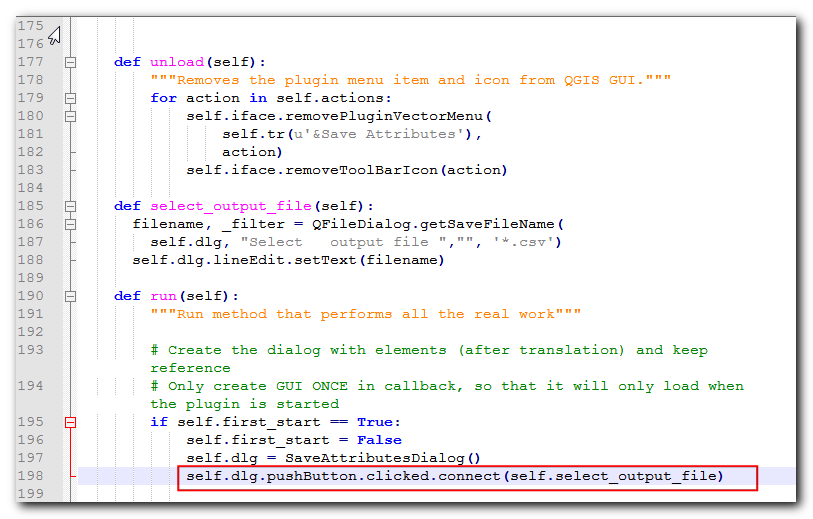
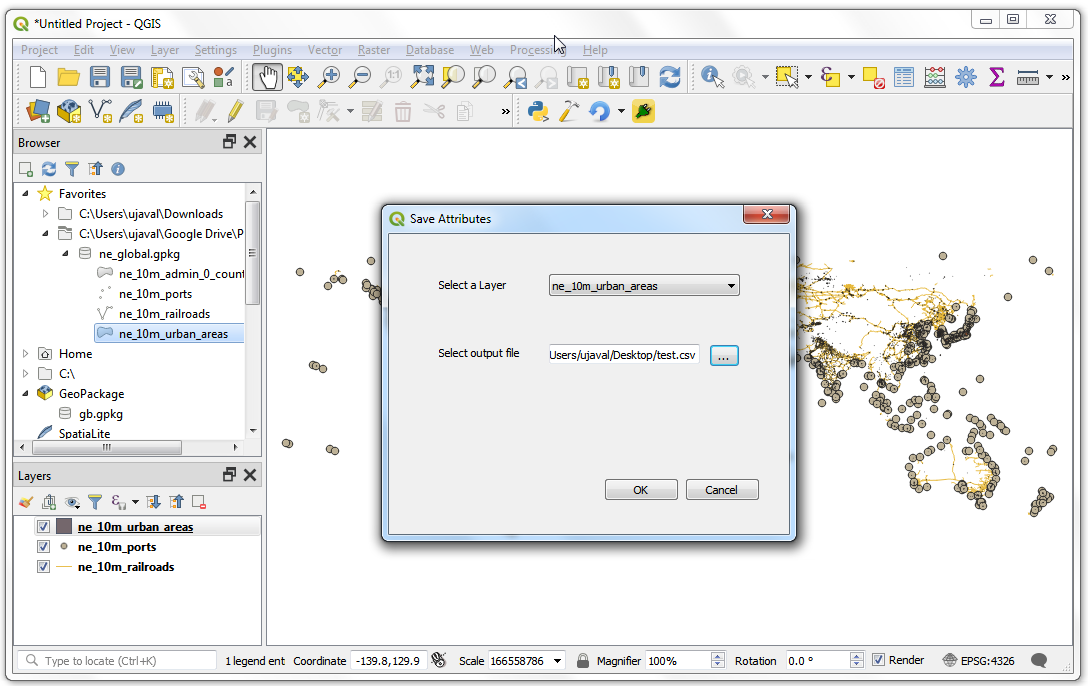
Back in QGIS, reload the plugin and run it. If all went fine, you will be able to click the
...button and select an output text file from your disk.
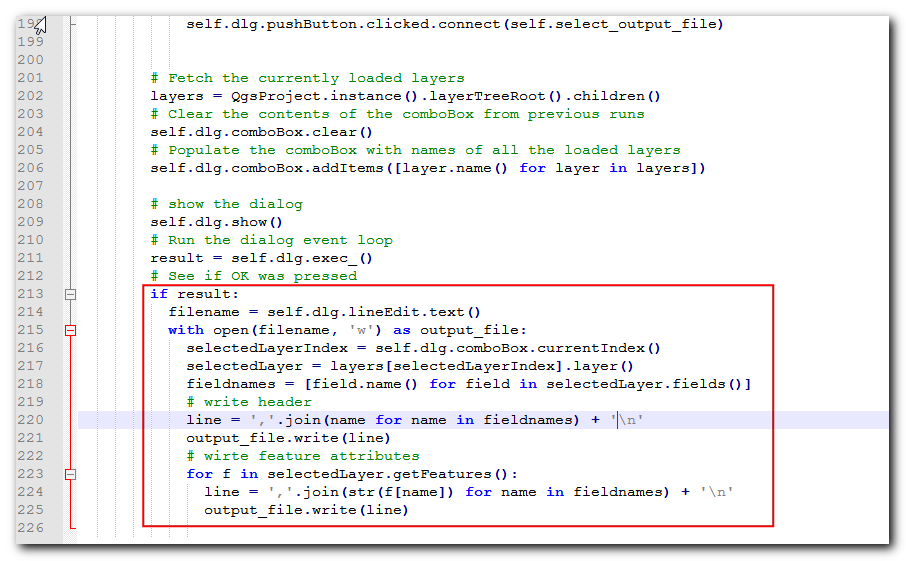
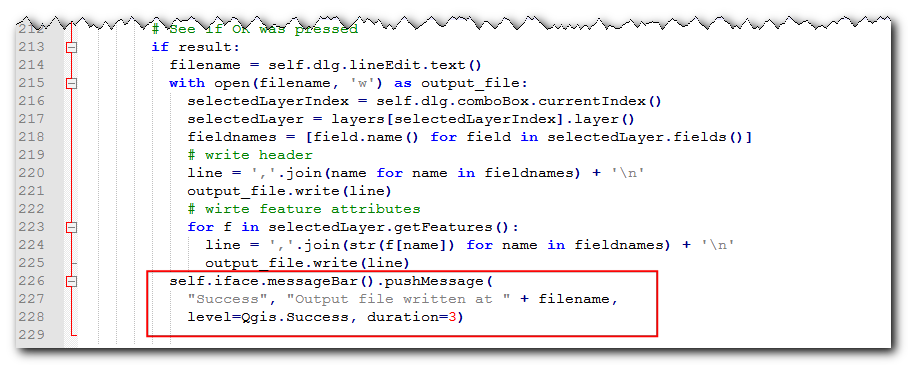
當按下 OK 時,什麼事都不會發生。這是因為我們還沒有加上把屬性的資訊轉存到文字檔內的城市部分。我們現在已經有所需的所有元素來做到這件事了,請前往
run的方法,其中會看到一個pass,再把它以如下的程式碼取代。這段程式碼的解釋可在 Python 程式設計的初步上手 (QGIS3) 中找到。filename = self.dlg.lineEdit.text() with open(filename, 'w') as output_file: selectedLayerIndex = self.dlg.comboBox.currentIndex() selectedLayer = layers[selectedLayerIndex].layer() fieldnames = [field.name() for field in selectedLayer.fields()] # write header line = ','.join(name for name in fieldnames) + '\n' output_file.write(line) # write feature attributes for f in selectedLayer.getFeatures(): line = ','.join(str(f[name]) for name in fieldnames) + '\n' output_file.write(line)
We have one last thing to add. When the operation finishes successfully, we should indicate the same to the user. The preferred way to give notifications to the user in QGIS is via the
self.iface.messageBar().pushMessage()method. AddQgistoqgis.corelist of imports at the top of the file and add the code below at the end of therunmethod.
self.iface.messageBar().pushMessage( "Success", "Output file written at " + filename, level=Qgis.Success, duration=3)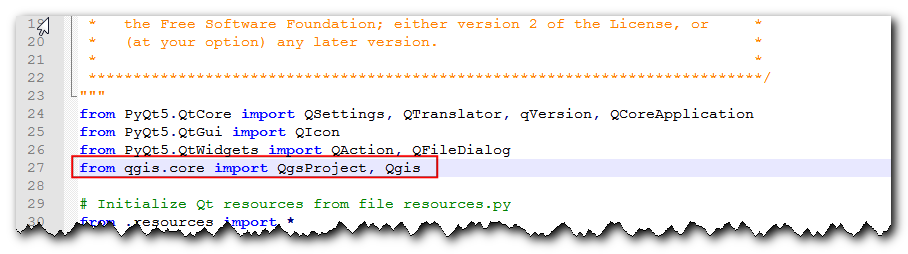
Now our plugin is ready. Reload the plugin and try it out. You will find that the output text file you chose will have the attributes from the vector layer.
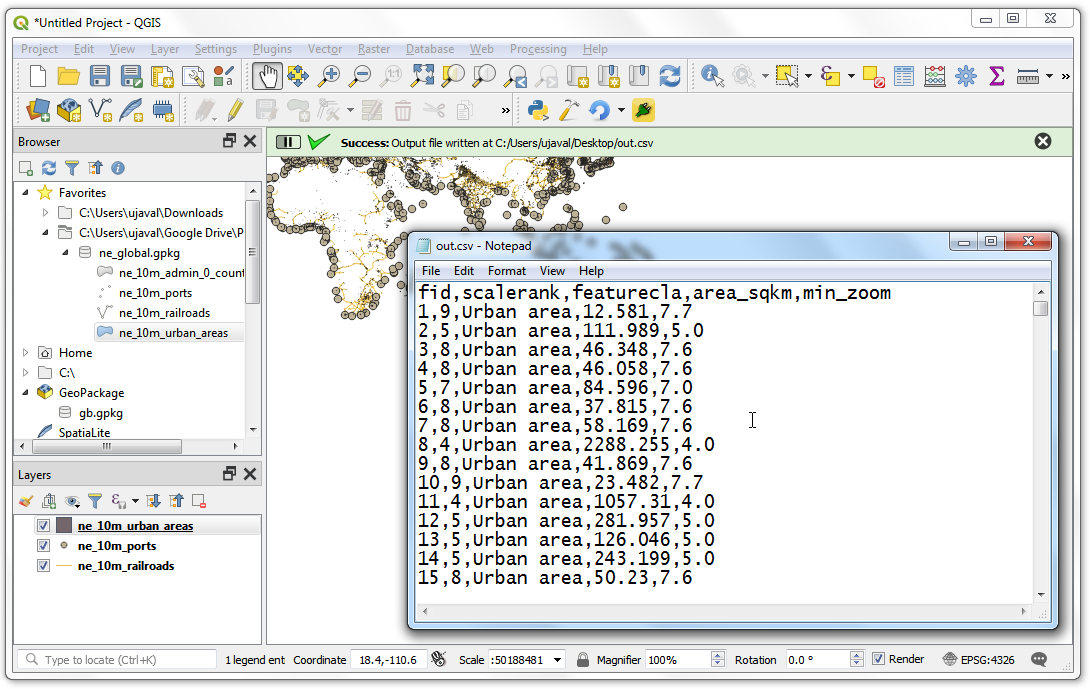
You can zip the plugin directory and share it with your users. They can unzip the contents to their plugin directory and try out your plugin. If this was a real plugin, you would upload it to the QGIS Plugin Repository so that all QGIS users will be able to find and download your plugin.
備註
本附加元件僅供示範使用,請勿任意出版或上傳至 QGIS 附加元件儲存庫。
以下放上完整的 save_attributes.py 檔做為參考。
# -*- coding: utf-8 -*-
"""
/***************************************************************************
SaveAttributes
A QGIS plugin
This plugin saves the attributes of the selected vector layer as a CSV file.
Generated by Plugin Builder: http://g-sherman.github.io/Qgis-Plugin-Builder/
-------------------
begin : 2019-03-28
git sha : $Format:%H$
copyright : (C) 2019 by Ujaval Gandhi
email : ujaval@spatialthoughts.com
***************************************************************************/
/***************************************************************************
* *
* This program is free software; you can redistribute it and/or modify *
* it under the terms of the GNU General Public License as published by *
* the Free Software Foundation; either version 2 of the License, or *
* (at your option) any later version. *
* *
***************************************************************************/
"""
from PyQt5.QtCore import QSettings, QTranslator, qVersion, QCoreApplication
from PyQt5.QtGui import QIcon
from PyQt5.QtWidgets import QAction, QFileDialog
from qgis.core import QgsProject, Qgis
# Initialize Qt resources from file resources.py
from .resources import *
# Import the code for the dialog
from .save_attributes_dialog import SaveAttributesDialog
import os.path
class SaveAttributes:
"""QGIS Plugin Implementation."""
def __init__(self, iface):
"""Constructor.
:param iface: An interface instance that will be passed to this class
which provides the hook by which you can manipulate the QGIS
application at run time.
:type iface: QgsInterface
"""
# Save reference to the QGIS interface
self.iface = iface
# initialize plugin directory
self.plugin_dir = os.path.dirname(__file__)
# initialize locale
locale = QSettings().value('locale/userLocale')[0:2]
locale_path = os.path.join(
self.plugin_dir,
'i18n',
'SaveAttributes_{}.qm'.format(locale))
if os.path.exists(locale_path):
self.translator = QTranslator()
self.translator.load(locale_path)
if qVersion() > '4.3.3':
QCoreApplication.installTranslator(self.translator)
# Declare instance attributes
self.actions = []
self.menu = self.tr(u'&Save Attributes')
# Check if plugin was started the first time in current QGIS session
# Must be set in initGui() to survive plugin reloads
self.first_start = None
# noinspection PyMethodMayBeStatic
def tr(self, message):
"""Get the translation for a string using Qt translation API.
We implement this ourselves since we do not inherit QObject.
:param message: String for translation.
:type message: str, QString
:returns: Translated version of message.
:rtype: QString
"""
# noinspection PyTypeChecker,PyArgumentList,PyCallByClass
return QCoreApplication.translate('SaveAttributes', message)
def add_action(
self,
icon_path,
text,
callback,
enabled_flag=True,
add_to_menu=True,
add_to_toolbar=True,
status_tip=None,
whats_this=None,
parent=None):
"""Add a toolbar icon to the toolbar.
:param icon_path: Path to the icon for this action. Can be a resource
path (e.g. ':/plugins/foo/bar.png') or a normal file system path.
:type icon_path: str
:param text: Text that should be shown in menu items for this action.
:type text: str
:param callback: Function to be called when the action is triggered.
:type callback: function
:param enabled_flag: A flag indicating if the action should be enabled
by default. Defaults to True.
:type enabled_flag: bool
:param add_to_menu: Flag indicating whether the action should also
be added to the menu. Defaults to True.
:type add_to_menu: bool
:param add_to_toolbar: Flag indicating whether the action should also
be added to the toolbar. Defaults to True.
:type add_to_toolbar: bool
:param status_tip: Optional text to show in a popup when mouse pointer
hovers over the action.
:type status_tip: str
:param parent: Parent widget for the new action. Defaults None.
:type parent: QWidget
:param whats_this: Optional text to show in the status bar when the
mouse pointer hovers over the action.
:returns: The action that was created. Note that the action is also
added to self.actions list.
:rtype: QAction
"""
icon = QIcon(icon_path)
action = QAction(icon, text, parent)
action.triggered.connect(callback)
action.setEnabled(enabled_flag)
if status_tip is not None:
action.setStatusTip(status_tip)
if whats_this is not None:
action.setWhatsThis(whats_this)
if add_to_toolbar:
# Adds plugin icon to Plugins toolbar
self.iface.addToolBarIcon(action)
if add_to_menu:
self.iface.addPluginToVectorMenu(
self.menu,
action)
self.actions.append(action)
return action
def initGui(self):
"""Create the menu entries and toolbar icons inside the QGIS GUI."""
icon_path = ':/plugins/save_attributes/icon.png'
self.add_action(
icon_path,
text=self.tr(u'Save Attributes as CSV'),
callback=self.run,
parent=self.iface.mainWindow())
# will be set False in run()
self.first_start = True
def unload(self):
"""Removes the plugin menu item and icon from QGIS GUI."""
for action in self.actions:
self.iface.removePluginVectorMenu(
self.tr(u'&Save Attributes'),
action)
self.iface.removeToolBarIcon(action)
def select_output_file(self):
filename, _filter = QFileDialog.getSaveFileName(
self.dlg, "Select output file ","", '*.csv')
self.dlg.lineEdit.setText(filename)
def run(self):
"""Run method that performs all the real work"""
# Create the dialog with elements (after translation) and keep reference
# Only create GUI ONCE in callback, so that it will only load when the plugin is started
if self.first_start == True:
self.first_start = False
self.dlg = SaveAttributesDialog()
self.dlg.pushButton.clicked.connect(self.select_output_file)
# Fetch the currently loaded layers
layers = QgsProject.instance().layerTreeRoot().children()
# Clear the contents of the comboBox and lineEdit from previous runs
self.dlg.comboBox.clear()
self.dlg.lineEdit.clear()
# Populate the comboBox with names of all the loaded layers
self.dlg.comboBox.addItems([layer.name() for layer in layers])
# show the dialog
self.dlg.show()
# Run the dialog event loop
result = self.dlg.exec_()
# See if OK was pressed
if result:
filename = self.dlg.lineEdit.text()
with open(filename, 'w') as output_file:
  selectedLayerIndex = self.dlg.comboBox.currentIndex()
  selectedLayer = layers[selectedLayerIndex].layer()
  fieldnames = [field.name() for field in selectedLayer.fields()]
  # write header
  line = ','.join(name for name in fieldnames) + '\n'
  output_file.write(line)
  # write feature attributes
  for f in selectedLayer.getFeatures():
    line = ','.join(str(f[name]) for name in fieldnames) + '\n'
    output_file.write(line)
self.iface.messageBar().pushMessage(
  "Success", "Output file written at " + filename,
  level=Qgis.Success, duration=3)
If you want to give feedback or share your experience with this tutorial, please comment below. (requires GitHub account)